Facing the “failed to obtain IP address” error on your Android phone? Learn how to fix it!
WiFi is an irreplaceable part of our lives, much like electricity and other commodities. We rely on it to access the Internet on a daily basis, whether it’s for work or pleasure. Therefore, having a non-working connection can be incredibly frustrating and may even cost you money.
The “failed to obtain IP address” message is an issue that plagues many users of all types of Android versions. Unless you fix it, you won’t be able to connect to the Internet. In this article, we’ll explain why the error occurs and how to work around it.
Without further ado, let’s dive in:
What Does “Failed to Obtain IP Address” Mean?
You may encounter the “failed to obtain IP address” error when you attempt to establish a connection with a WiFi network. As you probably already know, all connecting devices are assigned an Internet Protocol (IP) address by a router.
An IP address must be obtained by your device so that it’s able to connect to a router. However, this error indicates that it can’t, thereby leaving you unable to hop on the WiFi network. Here are a few common reasons why that happens:
- Device or software configuration issues
- Weak or poor WiFi signal
- Activated MAC filtering. Your device’s address may not be whitelisted on networks that require whitelisted MAC addresses.
- Your device doesn’t work properly with the chosen encryption type.
- Router problems. It could either be malfunctioning or facing configuration issues.

7 Methods to Fix the Failed to Obtain IP Address Error on Android
Fortunately, the “Failed to obtain IP address” error isn’t complicated and you can resolve it by using the methods discussed below:
Method #1 – Forget Network and Reconnect
By doing so, the router forgets your previous connection attempt and starts a new process to assign your device an IP address. If the WiFi connection issue is because of a temporary interference, this should fix it. Just follow these simple steps:
- Tap Settings.

- Tap Wi-Fi.

- Then, select Remove This Network.

- Once done, join this network again.
Method #2 – Give Your Device a Static IP Address
Since your device can’t get an IP address automatically through the router’s DHCP server, you can try to assign a static IP address manually. But this fix is temporary as you’ll need to reconfigure your network settings, switch off your WiFi, and restart your mobile device every time you connect to another network.
To assign a static IP address, follow these steps:
- Tap Settings.
- Tap Wi-Fi.
- Then, select Remove This Network.
- Now, tap the IP Settings drop-down and choose Static.
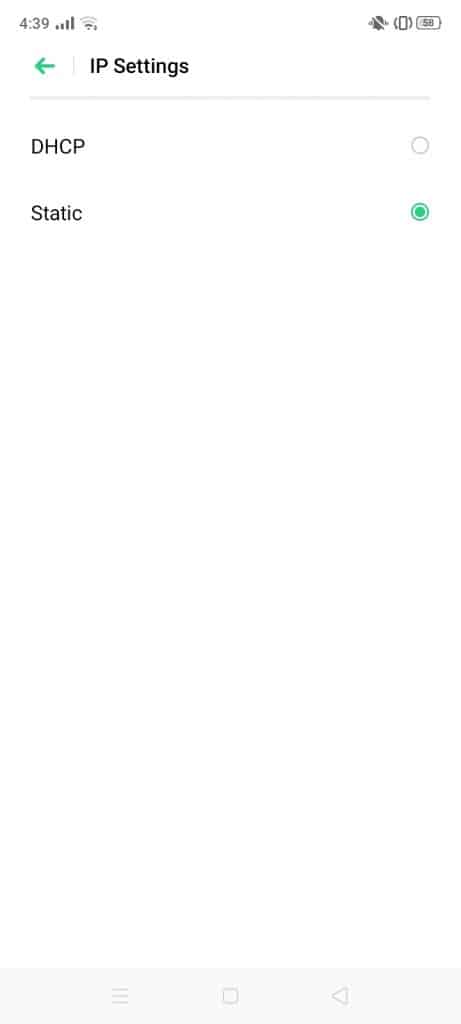 5. From the IP address field, change the last three numbers of your IP address to anything from 2 to 225.
 6. You are done.
Method #3 – Change the Encryption Method
AES (Advanced Encryption Standard) and WPA (Wi-Fi Protected Access) sometimes don’t function properly with Android mobile devices. Thus, your best bet is to switch between them, by accessing the settings in the router’s web interface.
Navigate to the security section and look for a field named Encryption Method, Encryption Mode, or something along those lines. Once you’re done changing the setting, reconnect to your WiFi network according to method #1.
Method #4 – Restart Your Mobile Device or Router
This straightforward method should work if the WiFi connection issue is due to some software conflict or glitch. Every router has a control interface, so the process of restarting it might be different. Usually, what works is entering your router’s IP in a browser to access the control panel.
Once logged in, you can restart your router from there. As far as your Android phone is concerned, hold down the power button for a few seconds. From the list of options, select “Power Off.” Then turn it back on.
Method #5 – Disable MAC Filtering
Your MAC address is a unique number that is assigned to the computer hardware when connecting to a network. The MAC filter only allows whitelisted MAC addresses for connecting, and your address may not be in the list.
This may result in you getting blocked on some sites, so a good option is to disable MAC filtering by logging into your router interface and toggle the “Disable/Enable MAC Filtering” option.
Method #6 – Turn Airplane Mode On and Off
Airplane mode, also known as flight mode, disconnects you from your mobile data and Wi-Fi, while at the same time restarting phone settings upon enabling and then disabling. Therefore, if you are facing some software distributions, swipe down from the top of your screen, and hit the “Airplane” mode button. Then hit it again to toggle it off.
Method #7 – Do a Factory Data Reset
If all the above methods fail to fix the issue, the best solution is to consider performing a factory data reset to switch all core functions back to their default settings. This option will also erase everything from your phone, bringing it back to its “factory-state”. As a result, when doing a factory data rest, make sure to back up any important files, and then follow the steps below:
- Go to Settings on your Android mobile device.
- Select System and navigate to Advanced Options.
- Click the Reset Options tab and select Erase All Data (Factory Reset).
- You will receive a prompt asking for confirmation.
Wrapping Things Up
If your Android mobile device or tablet fails to obtain an IP address successfully, any of the methods listed above should help in rectifying the issue and get you up and going in no time. However, if the problem still persists, don’t hesitate in letting us know in the comments section below so that we can guide you accordingly.
Haris Shahid
June 20, 2023
10 months ago