Port forwarding can help you host multiplayer game servers, access your files remotely, speed up internet traffic, and more. It is a simple tweak that can allow devices within your network to communicate more efficiently with the internet.
If modifying your router settings sounds daunting, do not worry. In our GL.iNet port forwarding guide, we will show you how to open ports without any fuss so you can get more from your home network.

What Information is Needed for GL.iNet Port Forwarding?
To set up port forwarding on a GL.iNet router properly, you must gather a few pieces of information:
- IP Address: Identify the local IP address of the device (personal computer, home server, etc.) that you want to receive incoming traffic. This device will use the forwarded port for its internet communications.
- Port Number and Protocol: Determine the internal port number used by your application or service. Also, find out whether it runs on TCP, UDP, or both.
- External Port: Decide if you will use the same port number externally or if a different port is needed for access from outside your local network.
- Router Credentials: You need to know the username and password to log into your GL.iNet router’s configuration interface. The default credentials are typically “admin” for both.
How to Port Forward on GL.iNet Router in Canada
Here is how you can set up port forwarding on GL.iNet routers:
Step #1: Access the Router’s Web Interface
- Open a web browser and enter the router’s IP address to access the web admin panel.
- Input your router’s username and password to log in.
Step #2: Find Port Forwarding Settings
- Go to Network > Firewall > Port Forwards.
- Click Add a New One to configure the new rule.
Step #3: Create the Port Forwarding Rule
- Name: Enter a name to identify the port forwarding rule.
- Protocol: Select the protocol (TCP, UDP, or both) depending on the requirements of the application or service you are forwarding.
- Internal IP: Enter the IP address of the device within your local network that you want the external traffic to reach.
- External Zone: Typically, this will be set to ‘wan’ if you are allowing access from the internet.
- External Ports: Specify the external port number(s) that your router should listen to for incoming traffic.
- Internal Zone: Usually set to ‘lan’ to indicate that the internal IP address belongs to the local network.
- Internal Ports: Input the port number(s) on the internal device that will receive the traffic forwarded through the external ports.
Step #4: Apply the Settings
- Click Add to confirm the configuration.
- Check if the new rule appears in the list of port forwards.
Step #5: Test the Configuration
- Access the service from outside your home network to check if the port forwarding setup is working.
GL.iNet Port Forwarding Made Easy!
PureVPN’s Port Forwarding simplifies the process of configuring ports on GL.iNet routers. No need to navigate complex menus—just a few clicks, and your ports are configured to be open or closed. It is designed to be quick, easy, and hassle-free. Find out more about our Port Forwarding add-on.
How to Port Forward GL.iNet Router with PureVPN

If you are looking for a straightforward way to open ports on your GL.iNet router, PureVPN’s Port Forwarding add-on can help. Here is how you can set it up:
- Sign up for PureVPN, add Port Forwarding to your plan, and complete the payment process.
- Download and install PureVPN on your device, launch the app, and log into your account.
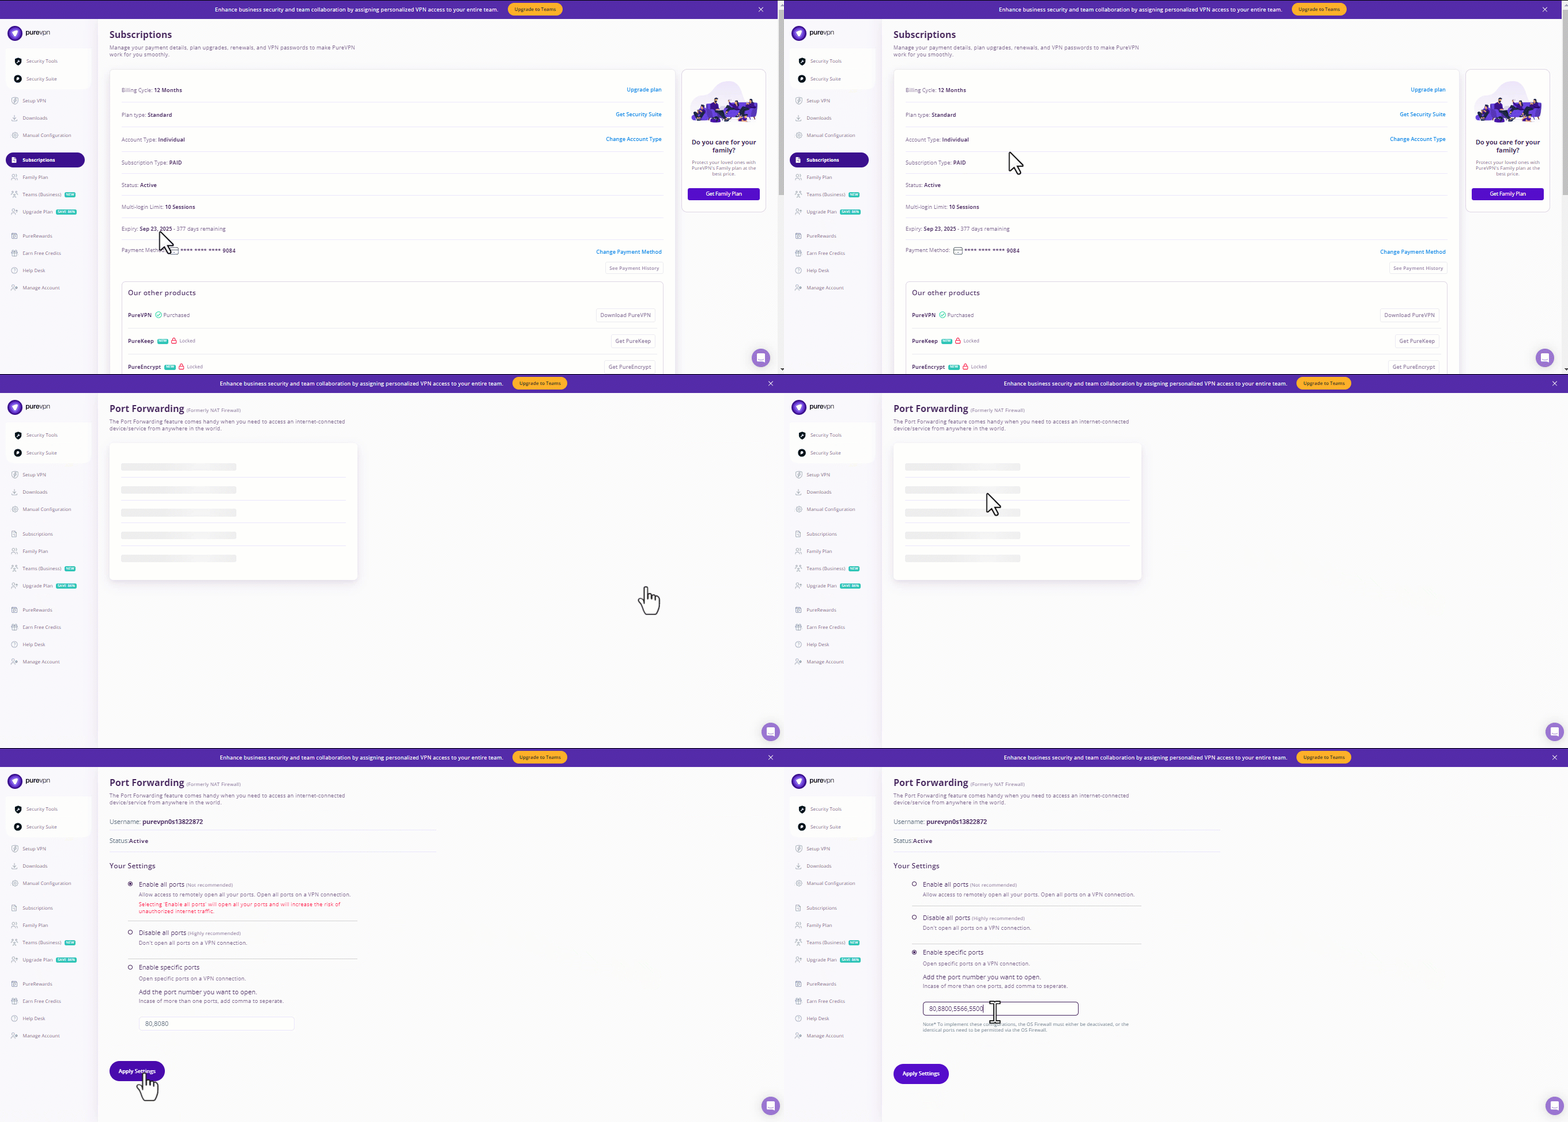
- Open the PureVPN Member Area, click Subscriptions, and hit the Configure button next to Port Forwarding.
- Select Enable specific ports, input the ports you want to open, and click Apply Settings.
- Connect to a server that supports port forwarding within the PureVPN app, and you are all set!
Why is GL.iNet Port Forwarding Not Working?
Here are some common reasons why port forwarding might not be working on your GL.iNet router along with their solutions:
- Incorrect Configuration Settings: Verify that the port forwarding settings are correctly entered, including the internal IP address, port numbers, and protocol (TCP/UDP). Check that the IP address corresponds with the device requiring the open ports.
- Firewall Interference: Review the firewall settings on the GL.iNet router and on any additional firewalls on your network or device. Consider creating exceptions for the ports you are forwarding.
- IP Address Changes: If the device you are forwarding ports to is set to get an IP address automatically that changes frequently, assigning a static IP address can prevent the issue.
- Firmware Issues An outdated or buggy firmware can cause functionality issues, including port forwarding problems. Make sure that your GL.iNet router is updated to the latest firmware version.
- Double NAT Issue: If you have another router on your network, you may be dealing with double NAT. Consider configuring your ISP’s device to run in bridge mode or set up port forwarding on both devices.
Frequently Asked Questions
192.168.8.1 is the default IP address for GL.iNet routers. You can enter this into a web browser to access your router’s web interface.
Yes, you can configure port forwarding on GL.iNet routers by navigating to Network > Firewall > Port Forwards within the router’s settings.
