The TP-Link Archer C1200 keeps your home network safe with a built-in firewall, which blocks incoming connections. However, this can often interfere with applications that need specific ports to run smoothly.
The solution? Open the right ports on your router to improve your online gaming, host a personal server, and more. Not sure how to start? Follow our guide to TP-Link Archer C1200 port forwarding.

What Information is Needed for TP-Link Archer C1200 Port Forwarding?
To set up port forwarding for TP-Link Archer C1200, you will need the following details:
- Device IP Address: Determine the IP address of the device for which you want to open the ports.
- Port Number and Protocol: Check which port number your application needs and if it uses TCP, UDP, or both protocols.
- External Port: Decide whether to keep the same port number for internal and external access, or use a different one.
- Router Credentials: Keep your router login details ready to access its settings and you make the necessary changes.
How to Enable Port Forwarding on TP-Link Archer C1200 in Australia
Here is a step-by-step guide to enable port forwarding on your TP-Link Archer C1200:
Step #1: Assign a Static IP
To keep your ports open even after your device reboots, set up a static IP address for the device you are forwarding a port to. Here is how you can do this:
- Reserve a fixed IP address through the router’s DHCP settings.
- Configure a static IP address directly on the device itself.
Step #2: Log into Your Router
To access your router’s web interface, you must:
- Open any web browser like Firefox, Edge, or Chrome.
- Type in your router’s IP address in the URL bar.
- Enter the router’s username and password to log in.
Step #3: Find the Port Forwarding Section
Now, let us create a port forwarding entry:
- Go to Basic > Network Map from the home screen.
- Select the Advanced tab at the top.
- Click NAT Forwarding in the left sidebar.
- Choose Virtual Servers and then click the green +Add link.
- In the Service Type box, name your new entry.
- Enter the desired ports in the External Port and Internal Port boxes.
- Type the static IP address of your device into the Internal IP box.
- Select the protocol (TCP, UDP, or Both) in the Protocol box.
- Check the Enable This Entry box to activate.
- Click OK to save your settings.
Step #4: Test if the Ports are Open
Lastly, you must check if the ports are correctly opened by:
- Using a port checker tool online, such as portchecker.co.
- Access the service or application from outside your network.
TP-Link Archer C1200 Port Forwarding Made Easy!
Setting up port forwarding on your TP-Link Archer C1200 just got easier. With our Port Forwarding add-on, you can skip the hassle of digging through complex router settings. Open or close ports on any device quickly and without stress.
How to Port Forward TP-Link Archer C1200 with PureVPN

Here is how you can use PureVPN to port forward your TP-Link Archer C1200 router in just a few clicks:
- Sign up for PureVPN, add Port Forwarding to your plan, and complete the payment.
- Download and install the PureVPN app, launch it, and log in using your credentials.
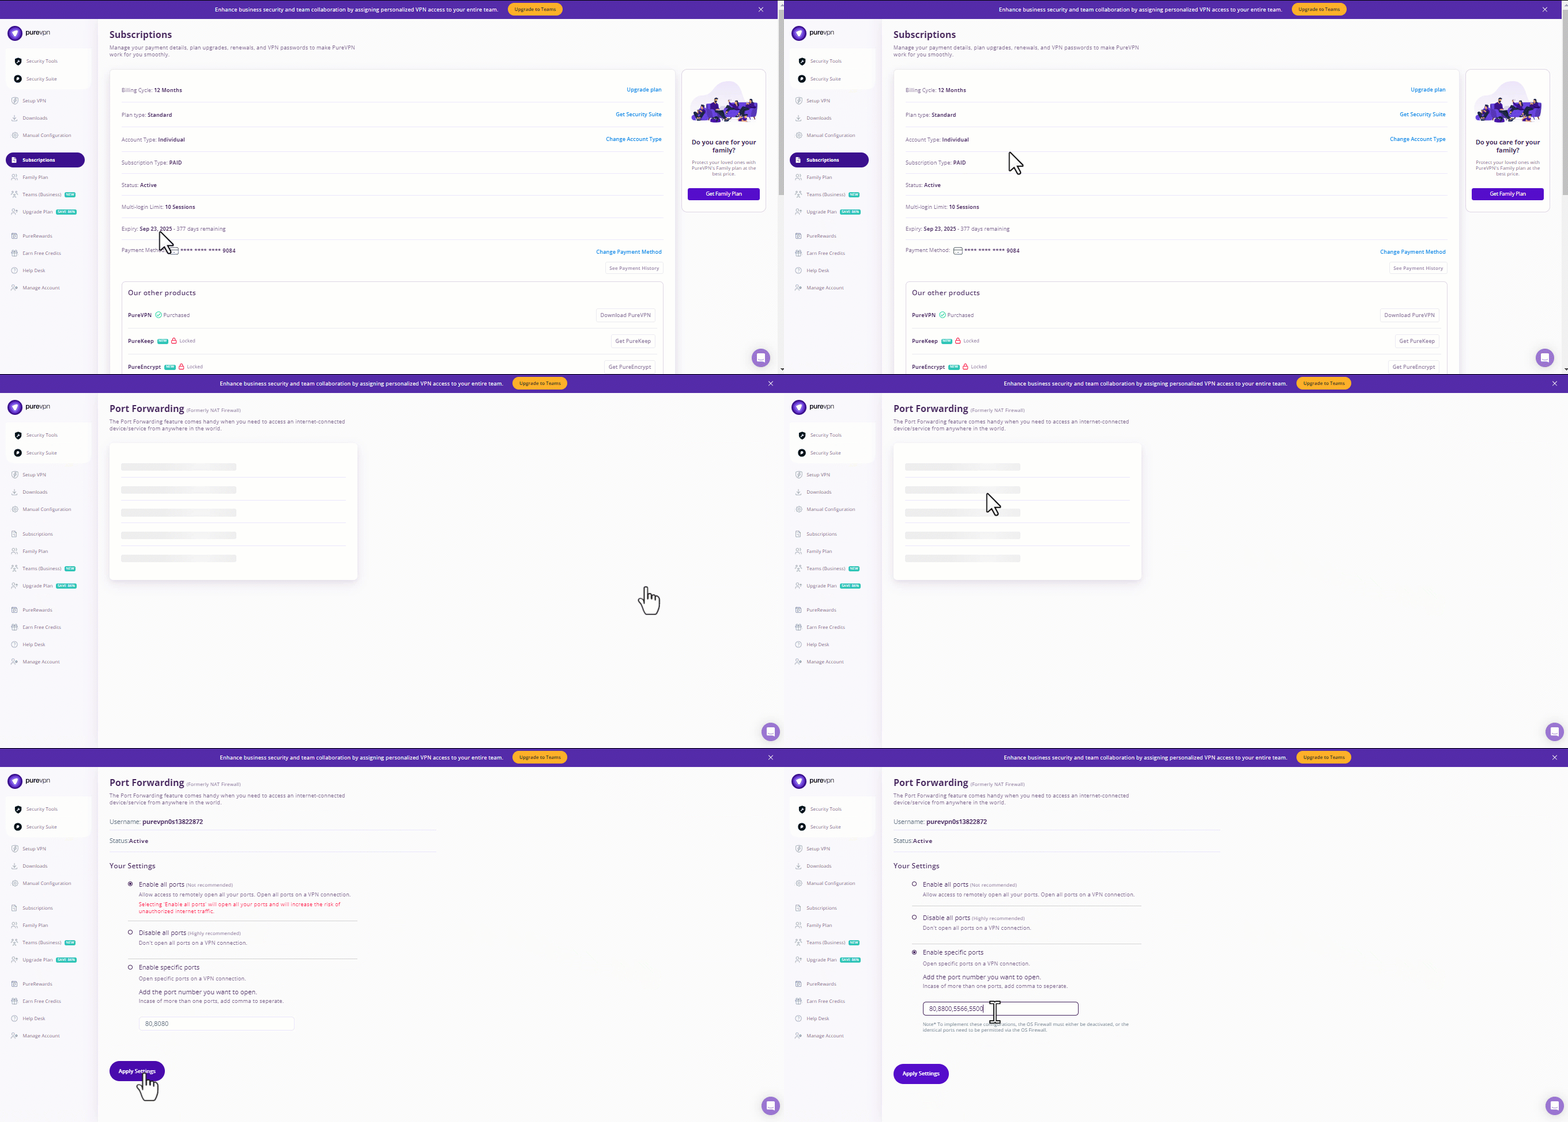
- Access the PureVPN Member Area, go to Subscriptions and click Configure next to Port Forwarding.
- Choose Enable specific ports, enter the ports you want to open, and click the Apply Settings button.
- Open the PureVPN app, connect to a port forwarding-supported server, and you are good to go!
Why is TP-Link Archer C1200 Port Forwarding Not Working?
If port forwarding is not working on your TP-Link Archer C1200, here is what you should check:
- Outdated Firmware: Out of date firmware can interfere with port forwarding. Check and update your router to the latest firmware version.
- Firewall Interference: Your computer’s firewall may block access to the ports. Adjust your firewall settings to allow both incoming and outgoing traffic on those ports.
- Wrong Device IP: Make sure the IP address you have entered for port forwarding is correct for the device you intend to use.
- ISP Restrictions: Some internet service providers may restrict certain ports for security purposes. Contact your ISP to confirm if the ports you need are open for use.
Frequently Asked Questions
The default username and password for TP-Link Archer C1200 routers is “admin” unless you change it to something else.
To set up port forwarding on your TP-Link Archer C1200, go to Basic > Network Map > NAT Forwarding > Virtual Servers.
