
Whether you are setting up a home server or fine-tuning your network for lag-free online gaming, port forwarding is your go-to solution. It guides your traffic right where it needs to go, improving your performance and providing stable access to your services.
Tweaking your router settings might seem a complicated task, but it does not have to be. In our TP-Link port forwarding guide, we will walk you through the entire process to help you set it up without any hassle.
What Information is Needed for TP-Link Port Forwarding?
To set up TP-Link router port forwarding correctly, you will need the following details:
- IP Address: Find the local IP address of the device (e.g., computer, server) that you wish to direct incoming traffic to. This device will use the forwarded port to communicate with the internet.
- Port Number and Protocol: Identify the internal port number that your application or service uses. You should also know whether it uses the TCP protocol, UDP protocol, or both.
- External Port: Determine whether you will use the same port number externally or if a different port number is required when accessed from outside your local network.
- Router Credentials: To access your TP-Link router’s web interface, you must know the username and password, which is “admin” for both unless you have changed it.
How to Port Forward on TP-Link Router
These steps will enable you to configure port forwarding in TP-Link routers:
Step #1: Access the Router’s Web Interface
- Open a web browser and enter the router’s IP address (usually http://192.168.1.1) into the address bar.
- Log in using your router’s admin credentials.
Step #2: Locate Port Forwarding Settings
- Navigate to Advanced > NAT Forwarding > Port Forwarding.
- Click Add New to create a new port forwarding rule.
Step #3: Configure the Port Forwarding Rule
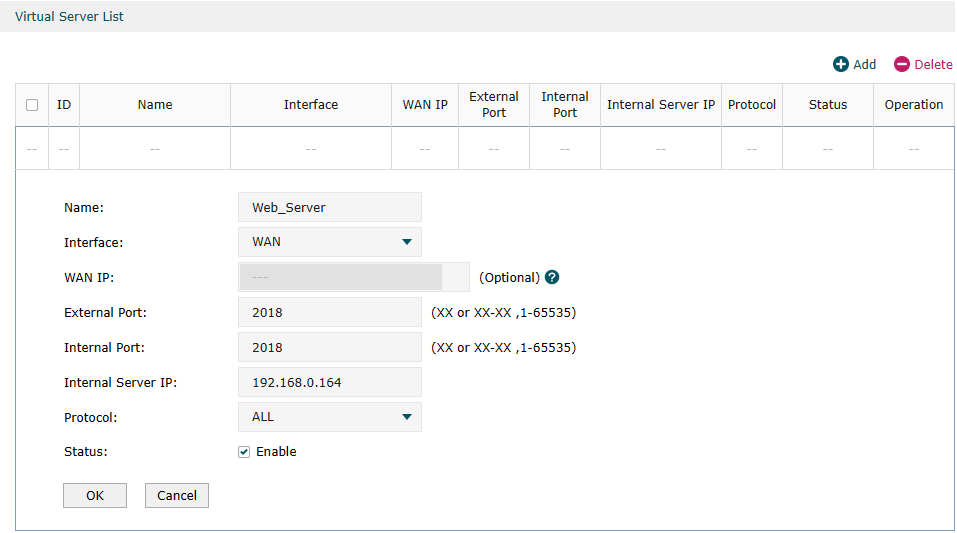
- Service Port: Enter the external port or port range you want to forward (e.g., 80 for HTTP).
- IP Address: Enter the internal IP address of the device to which you want to route traffic.
- Internal Port: Enter the port number on the device that will receive the traffic. It is often the same as the service port.
- Protocol: Select the protocol (TCP, UDP, or Both) depending on your needs.
- Status: Make sure the rule is enabled.
Step #4: Apply the Settings
- Click Save to confirm the configuration.
- Check if the rule appears correctly in the Port Forwarding list.
Step #5: Test the Configuration
- Confirm that the device with the specified internal IP is set up to accept connections on the forwarded port.
- Access the service from an external network to test the port forwarding setup.
Visual Summary
| Step | Action | Notes |
|---|---|---|
| 1 | Reserve Local IP | Via DHCP or manual assignment—Prevents IP auto-change |
| 2 | Login to Router | Use http://tplinkwifi.net or gateway IP |
| 3 | Navigate to Virtual Servers | Found under Advanced → NAT Forwarding |
| 4 | Create Port Rule | Name, ports, IP, protocol → Save |
| 5 | Test External Access | Use WAN IP and port, ensure firewall allows traffic |
TP-Link Router Port Forwarding Made Easy!
PureVPN’s Port Forwarding add-on makes the process of managing ports on TP-Link routers a breeze. No need to dig through complicated menus, just a few clicks, and your ports are open or closed. It is quick, easy, and saves you the hassle. Learn more about PureVPN’s Port Forwarding.
Multiple Devices, Port Ranges, and Conflicts
If two devices run the same service port (e.g., two PCs on port 90), use different external ports, like 9000 and 9001, both forwarding to internal port 90 on separate devices.
To forward a range e.g., ports 1000–2000—leave internal ports blank and specify the range externally.
How to Port Forward TP-Link Router with PureVPN

Opening ports on your TP-Link router does not have to be a hassle. With PureVPN’s Port Forwarding add-on, it is as simple as 1,2,3. Here is how you can do it:
- Sign up for PureVPN, include the Port Forwarding add-on to your plan, and complete the payment.
- Download and install the PureVPN app for your device, launch it, and log in using your credentials.
- Access the PureVPN Member Area, go to Subscriptions and click Configure next to Port Forwarding.
- Choose Enable specific ports, enter the ports you want to open, and click the Apply Settings button.
- Open the PureVPN app, connect to a port forwarding-supported server, and you are good to go!
Why is TP-Link Port Forwarding Not Working?
If your TP-Link port forwarding is not working, the following are some potential reasons to lookout for:
- Incorrect Router Settings: Port forwarding rules may not be properly configured in your TP-Link router settings, such as selecting the wrong IP address or port numbers. Double-check your input details.
- ISP Restrictions: Some internet service providers block specific ports to enhance network security, which can prevent port forwarding from working as expected. Contact your ISP to confirm.
- Firewall or Antivirus: Your device’s firewall or antivirus software might block the forwarded ports, interfering with the connection. Try disabling these temporarily to test.
- Double NAT Issue: If you use multiple routers (e.g., modem-router combos), the double NAT can prevent proper port forwarding. Set your TP-Link router to bridge mode.
- Dynamic IP Address: If your local IP address changes frequently, port forwarding may stop working. Assign a static IP address to your device to avoid this issue.
- Unsupported Server Settings: The server or service you are trying to connect to may not support the forwarded ports or requires additional configuration. Check with the service provider for compatibility.
- Firmware Issues: Outdated or buggy firmware on your TP-Link router could cause port forwarding failures. Update to the latest firmware version.
- UPnP Conflicts: Your router’s UPnP settings might conflict with your manual configurations. Simply disable it to resolve the issue.
Frequently Asked Questions
The default IP is typically 192.168.0.1 or 192.168.1.1. You can access your router’s admin panel by entering this IP in your browser’s address bar.
Yes, TP-Link routers support port forwarding. You can configure it in the router’s admin panel under the Port Forwarding section.
PureVPN
October 24, 2025
4 months ago