

Unable to open ports on MikroTik routers at home? Some consumers struggle to open ports because of low technical expertise, while others can’t get around CGNAT. This guide explains how to port forward MikroTik routers using our systematic step-by-step guide.
Table of Contents
Understanding the “Why”: The Essence of Port Forwarding
Imagine your home or office network as a secure castle. You have numerous devices inside – a web server, a gaming console, an IP camera, or a media server – all tucked away behind your MikroTik router, which acts as the castle’s vigilant gatekeeper. By default, this gatekeeper allows outgoing connections from your internal devices to the internet but blocks unsolicited incoming connections for security reasons.
However, what if you want to access your IP camera while you’re on vacation, or host a gaming server for your friends to join, or perhaps run a personal website from your internal server? This is where port forwarding steps in.
Port forwarding, in essence, is a Network Address Translation (NAT) technique that tells your MikroTik router: “When an external connection arrives at my public IP address on a specific port, don’t block it! Instead, redirect it to a particular internal IP address and port within my private network.” It creates a direct, intentional pathway through your router’s firewall, allowing external devices to initiate connections to specific services running on your internal machines.
The MikroTik Advantage: Precision and Control
MikroTik’s RouterOS offers an exceptionally granular level of control over network traffic, and port forwarding is no exception. Unlike many consumer-grade routers with limited port forwarding options, MikroTik provides a powerful “dst-nat” (destination NAT) rule within its firewall, allowing for highly specific and flexible configurations. This is where the magic happens.
Key Applications of MikroTik Port Forwarding:
- Remote Access: Accessing IP cameras, DVRs, network-attached storage (NAS), or your home server from anywhere in the world.
- Gaming: Opening specific ports required by online games for smooth multiplayer experiences and to avoid NAT type issues.
- Web Hosting: Running a personal website or web application from a server within your local network.
- FTP/SSH Servers: Providing external access to file transfer protocol (FTP) or secure shell (SSH) servers for remote file management or command-line access.
- Voice over IP (VoIP): Ensuring proper functioning of VoIP systems that require specific ports to be open.
How Port Forwarding Works on MikroTik Routers
MikroTik uses Firewall NAT rules to handle port forwarding. The process involves:
- Receiving an external request on a specific port.
- Forwarding the request to an internal IP and port.
- Allowing the traffic through the firewall.
Prerequisites Before You Begin
Before diving into port forwarding on a Mikrotik router, make sure you’ve got a few things sorted:
- Your device’s local IP address (e.g., 192.168.88.10). This should ideally be static or reserved in DHCP.
- The service port number (e.g., 80 for HTTP, 3389 for RDP, 25565 for Minecraft, etc.).
- Access to Mikrotik router via Winbox or WebFig (or even CLI, if you’re feeling brave).
- Your WAN interface name – usually it’s
ether1, but double-check in the “Interfaces” menu.
If any of those seem foreign, don’t worry, we’ll walk through them as we go.
How to Port Forward on MikroTik Routers
Here’s a step-by-step guide on how to set up port forwarding on MikroTik routers:
- Access Your Router: Connect to your MikroTik router via WinBox or WebFig. Make sure you have administrative access.
- Open Firewall Settings: Go to the IP section and select Firewall.
- Add a NAT Rule: In the NAT tab, click Add New to create a new rule.

- Configure the Rule:
- Chain: Select dstnat to change the destination address of packets passing through the router.
- Protocol: Choose TCP (or another protocol as required).
- Dst. Port: Enter the external port number that you want to forward (e.g., 80 for HTTP).
- In. Interface: Specify the incoming interface, typically your WAN or external interface.
- Action: Select dst-nat to redirect the packet.
- To Addresses: Enter the internal IP address of the server where the traffic should be redirected.
- To Ports: Specify the internal port if different from the external port.

- Apply and Save: Confirm the settings and save the rule.
- Adjust Firewall Filters (if necessary): Check if your firewall settings allow traffic on the forwarded port. You might need to add a filter rule to accept inbound connections on the forwarded port:
- Go to the Filter Rules tab in the Firewall settings.
- Add a new rule to accept connections, specifying the same protocol and dst. port as in your NAT rule.
- Test the Configuration: To confirm that your port forwarding is set up correctly, you can use online port checking tools like CanYouSeeMe.org or PortCheckTool.com. Simply enter your public IP address and the port you configured for forwarding.
Advanced MikroTik Port Forwarding Techniques
1. Forwarding a Range of Ports
If you need multiple ports (e.g., for VoIP or gaming):
- In the NAT rule, set Dst. Port as
5060-5080(for SIP). - Use the same To Addresses but adjust To Ports if mapping differs.
2. Using Hairpin NAT (Loopback Forwarding)
Hairpin NAT lets internal devices access forwarded services via the public IP.
- Add a masquerade rule in
srcnat:- Src. Address: Your LAN subnet (e.g.,
192.168.88.0/24). - Dst. Address: Your public IP.
- Action:
masquerade
- Src. Address: Your LAN subnet (e.g.,
3. Securing Port Forwarding with Firewall Rules
Open ports are a security risk. Mitigate threats by:
- Restricting source IPs (only allow known IPs).
- Using VPN instead (more secure than exposing ports; PureVPN recommended).
- Changing default ports (e.g., SSH from
22to2222).
4. Dynamic DNS (DDNS) for Changing Public IPs
If your ISP assigns dynamic IPs, use MikroTik’s DDNS client:
- Go to IP → Cloud.
- Enable DDNS and register a hostname.
- Use this hostname instead of the IP in your port forwarding setup.
Example 1: Forwarding HTTP (Port 80) to an Internal Web Server
Let’s say you have a web server with an internal IP of 192.168.1.50 and it’s listening on the standard HTTP port 80. Your WAN interface is ether1-gateway.
- General Tab:
- Chain:
dstnat - Protocol:
6 (tcp) - Dst. Port:
80 - In. Interface:
ether1-gateway
- Chain:
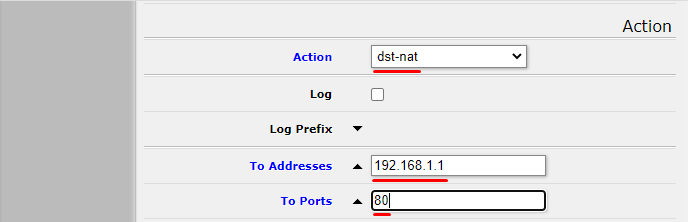
- Action Tab:
- Action:
dst-nat - To Addresses:
192.168.1.50 - To Ports:
80
- Action:
- Comment: “Web Server – HTTP”
Example 2: Forwarding RDP to a Windows PC
Let’s say you want to access your Windows PC remotely using Remote Desktop (RDP), which runs on port 3389. Your PC’s local IP is 192.168.88.20. Here’s how your rule would look:
- Chain: dstnat
- Protocol: tcp
- Dst. Port: 3389
- Action: dst-nat
- To Address: 192.168.88.20
- To Port: 3389
Now when someone tries to access your public IP on port 3389, they’ll be connected directly to that Windows machine.
Port Forwarding via Mikrotik Terminal (CLI Lovers)
If you prefer command-line configuration or need to script your setup, here’s a sample CLI command:
/ip firewall nat add chain=dstnat protocol=tcp dst-port=8080 action=dst-nat to-addresses=192.168.88.10 to-ports=8080
And for masquerade (if it’s not already there):
/ip firewall nat add chain=srcnat out-interface=ether1 action=masquerade
Simple, efficient, and scriptable.
Why is port forwarding an issue on MikroTik routers?
Port forwarding issues on MikroTik routers can stem from your ISP using CGNAT, which assigns the same public IP address to multiple subscribers. This method is a workaround for the limited availability of IPv4 addresses, but it complicates direct internet access to specific devices on your home network.
When your network is under CGNAT, the absence of a unique public IP for your router means that externally initiated requests do not directly reach your internal network. This scenario applies to all routers, not just MikroTik, and generally requires alternative solutions such as coordinating with your ISP or using a VPN service to facilitate direct access.
What is CGNAT?
CGNAT (Carrier-Grade NAT) is a technology used by ISPs to conserve IPv4 addresses by allowing multiple customers to share a single public IP address. This helps extend the life of IPv4 addresses but makes it difficult for individual devices on your network to be accessed directly from the internet, complicating tasks like port forwarding.
Why Do ISPs Use CGNAT?
ISPs rely on CGNAT for:
- Managing IPv4 Shortage: IPv4 addresses are almost fully allocated. CGNAT helps ISPs stretch their IPv4 resources by allowing multiple customers to share one public IP address, relieving pressure on limited IPv4 supplies.
- Avoiding IPv6 Transition Cost: Moving to IPv6 is complex and costly. CGNAT provides a budget-friendly solution, enabling ISPs to handle network demands with fewer IPv4 addresses, delaying the expense and challenges of IPv6 migration.
- Ensuring Service Continuity: CGNAT allows ISPs to continue using existing IPv4 setups without major changes to network infrastructure or customer equipment, preserving service reliability as they prepare for future IPv6 integration.
The Downsides of CGNAT
If your MikroTik router is behind CGNAT, you will encounter:
- Complicated Port Forwarding: Under CGNAT, multiple users share a single public IP address, complicating port forwarding. This makes it challenging to set up home servers or remotely access devices, as direct access to individual devices on the network is hindered.
- Online Gaming Issues: CGNAT can significantly affect online gaming by introducing connectivity and latency issues. Many online games require a direct connection to other players, and CGNAT can lead to frequent disconnections and high ping times, degrading the gaming experience.
- Trouble Hosting Servers: Hosting services such as web, file, or game servers becomes difficult with CGNAT because it blocks incoming connections. This makes it impossible for external users to initiate contact with servers behind CGNAT.
- VoIP Functionality Problems: The additional layer of NAT imposed by CGNAT can disrupt VoIP services, causing connection delays and packet loss. Since VoIP relies on direct IP communication, CGNAT can degrade the quality and reliability of calls.
How to port forward on MikroTik and bypass CGNAT with PureVPN
With PureVPN’s port forwarding add-on, you can automatically open ports with extra security on most routers and even bypass CGNAT. The best part is that PureVPN comes with a multiport feature that picks the best port and defines which ones are open.
Follow the instructions below to configure port forwarding settings using PureVPN:

- Sign up for PureVPN, add Port Forwarding to your plan, and complete the payment.
- Download and install the PureVPN app, launch it, and log in using your credentials.
- Access the PureVPN Member Area, go to Subscription and click Configure next to Port Forwarding.
- Choose Enable specific ports, enter the ports you want to open, and click the Apply Settings button.
- Open the PureVPN app, connect to a port forwarding-supported server, and you are good to go!
Host a server with dedicated IP and port forwarding add-on
A Dedicated IP allows you to create servers and external IP addresses to connect to your server without any IP mapping issues. You need a dedicated IP with a Port Forwarding add-on if you wish to host a game server, get your IP whitelisted, or want your friends to connect to your at-home devices.
Why choose PureVPN?
Thousands of PureVPN customers are using PureVPN’s port forwarding add-on for their port forwarding needs. Our customer support representatives work round the clock to help customers at every step. More than 80% of our add-on users are happy with the results and open ports on many routers, including MikroTik.
Unlike your ISP, you can manually open ports on multiple routers rather than requesting your ISP or getting a VPS at a higher price. You can use the PureVPN add-on as a solution to bypass CGNAT gateways regardless of the router you are using at home.
Common Port Forwarding Issues & Fixes
| Issue | Possible Cause | Solution |
|---|---|---|
| Port shows closed | Firewall blocking traffic | Check Filter Rules |
| Service not responding | Wrong internal IP/port | Verify NAT rule settings |
| Intermittent access | ISP blocking ports | Try a different port |
| Slow connections | Misconfigured NAT | Optimize firewall rules |
Frequently Asked Questions
Port forwarding may not work on your Mikrotik router for several reasons, such as your ISP using CGNAT, which shares public IP addresses and blocks incoming connections. Additionally, incorrect firewall settings or errors in the port forwarding configuration can prevent successful connections.
The best workaround for Mikrotik CGNAT is using a port forwarding VPN like PureVPN. This allows you to route specific internet traffic directly to your device by bypassing the usual CGNAT limitations imposed by ISPs. This method ensures a smoother and more reliable connection for services that require stable internet access.
1- Enter your router’s IP address into your browser bar. Log in when prompted.
2- Navigate to the “Port Forwarding” section and fill out the forwarding form.
3- Check “Enabled” or “On” next to Port 80. Then, save your settings.
Conclusion
MikroTik port forwarding is a powerful feature, but it must be configured carefully to balance functionality and security. By following this guide, you can safely expose internal services to the internet while minimizing risks.
PureVPN
October 21, 2025
7 months ago