You forward the port on your router, save the rule, and test it, but the port still shows as closed. Even though the local settings look right, incoming connections never reach your NAS, game server, remote desktop, or other self-hosted service. Carrier-Grade Network Address Translation (CGNAT) is often the reason.
Your ISP shares one public IPv4 address across multiple customers, which puts the public-facing NAT layer outside your network and beyond your router’s control. In this guide, we explain why standard port forwarding does not work behind CGNAT and the options available to work around it.
Can You Port Forward Behind CGNAT?
Not with a standard router port forwarding rule alone. Behind CGNAT, you do not have a public IPv4 address assigned directly to your router, so incoming traffic from the internet has no direct route to your network.
To get around it, you need another route that does not depend on the ISP-controlled NAT mapping, such as getting a public IPv4 address, using a port forwarding VPN, or connecting over IPv6 where supported.
How to Check if You Are Behind CGNAT
Before changing your port forwarding settings, confirm that CGNAT is actually the issue. A WAN IP in the 100.64.0.0/10 range is a strong sign, while a WAN IP that does not match your public IPv4 address can also point to another NAT layer upstream.
A mismatch does not always mean CGNAT, though, since double NAT can look similar. If you are not sure what your connection is using, our guide on how to check whether your ISP uses CGNAT walks you through how to confirm it.

Ways to Port Forward Behind CGNAT
You have a few options for getting inbound traffic through CGNAT.
Request a Public IPv4 Address From Your ISP
Ask your ISP if it can provide a public IPv4 address or move your connection off CGNAT. Once your router receives a publicly reachable IPv4 address, standard router port forwarding can work again.
The address does not necessarily need to be static. A dynamic public IPv4 address can still support port forwarding, although the address itself may change over time. A static IP is useful when you need the same public address to remain available.
Related Read: IPv4 vs IPv6
Use a VPN With Port Forwarding
A VPN that supports port forwarding gives incoming traffic another public-facing endpoint. Traffic sent to the forwarded port on the VPN server can then reach the application or service through the VPN connection.
You do not need control over the ISP’s CGNAT mappings for that route to work. PureVPN supports port forwarding through an add-on, so the opened port is handled through the VPN connection rather than the ISP-controlled CGNAT layer.
Connect Over IPv6
IPv6 takes CGNAT out of the IPv4 path rather than forwarding a port through it. If your ISP provides globally routable IPv6 and both ends of the connection support it, the service can be reached over IPv6 instead.
Firewall rules still apply, so the required inbound traffic needs to be allowed before the service can accept connections. You may also need to check that the application is listening on IPv6 and not only on IPv4.
Use a Reverse Tunnel or VPS
A reverse tunnel avoids the CGNAT inbound path altogether. The device inside your network makes an outbound connection to an internet-reachable server or tunnelling service, which can then carry incoming traffic back to the local service.
Reverse tunnels can work well for remote access and certain self-hosted services, but they usually require more configuration than getting a public IPv4 address from your ISP or using a VPN with port forwarding.
Open Ports Behind CGNAT With PureVPN
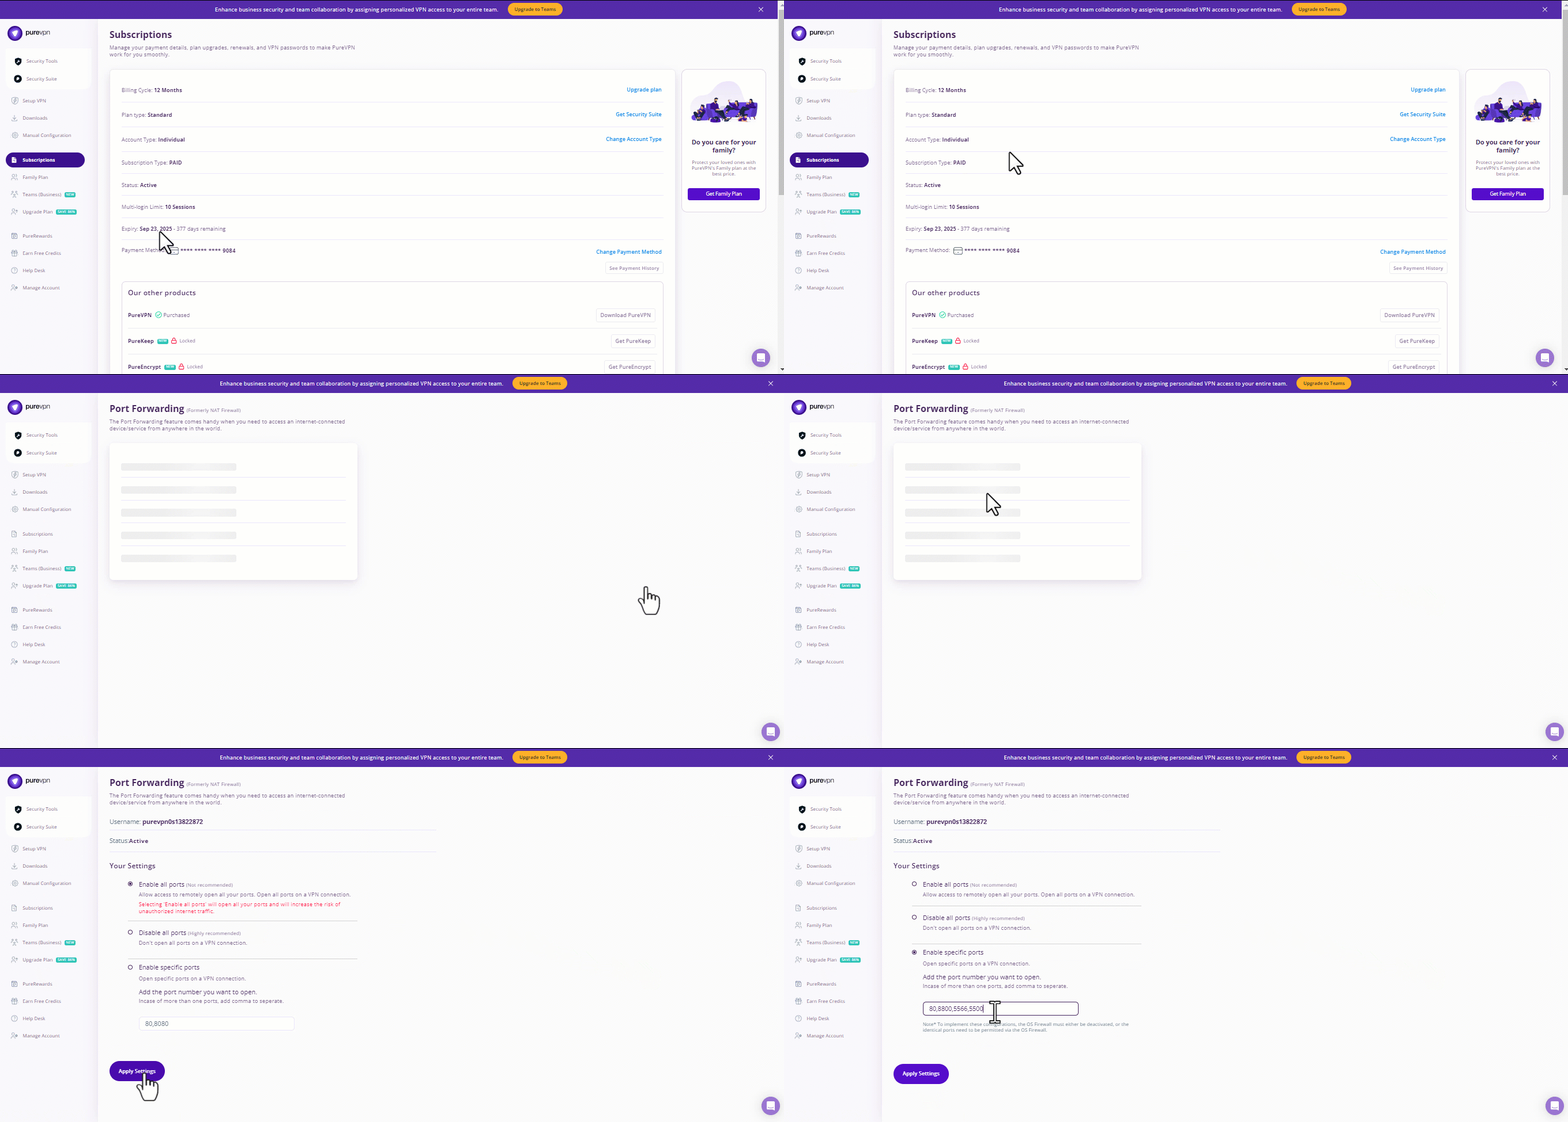
When CGNAT prevents standard router port forwarding, PureVPN can handle the forwarded port through the VPN connection instead. Follow these steps to configure it:
Step 1: Get the Port Forwarding Add-On
Log in to the PureVPN Member Area and go to Subscriptions. Find Port Forwarding, select Get This Add-on, and confirm the order to add it to your existing PureVPN subscription.
Step 2: Configure Port Forwarding
Once the add-on is active, return to Subscriptions and select Configure next to Port Forwarding. PureVPN gives you three options:
- Enable all ports to allow traffic through all ports.
- Disable all ports to block incoming traffic through the VPN connection.
- Enable specific ports to open only the ports you need.
Step 3: Apply Your Port Forwarding Settings
After entering the ports you want to open, select Apply Settings. The Port Forwarding policy is then saved to your PureVPN account.
Step 4: Connect to a Port Forwarding-Supported Location
Open the PureVPN app and connect to a location that supports Port Forwarding. On macOS, Windows, Android, and iPhone, supported locations are marked with a PF tag.
Why Is Port Forwarding Still Not Working Behind CGNAT?
If the port still appears closed, check the following:
- The forwarded port does not match the service: Make sure the forwarding rule uses the same port and protocol as the application or service.
- The service is not running or listening: Keep the application or service active while testing the port.
- A firewall is blocking the connection: Check that the application or required port is allowed through your firewall.
- Your device’s local IP address changed: For router-based forwarding, make sure the rule still points to the correct local IP.
- You are behind double NAT: Another router or gateway may still be blocking the inbound path.
- You did not save the policy: Save your Port Forwarding policy before connecting to PureVPN.
- You are not connected to a PF location: Connect to a location marked with the PF tag in the PureVPN app.
Can I port forward using Carrier Grade Network Address Translation (CGNAT) IP?
Unfortunately, you can’t open ports on a router behind CGNAT. ISPs (internet service providers) perform CGNAT to limit users to a single pool of IP addresses and use a single IP for multiple users on the same network. And, even if you try to open ports behind CGNAT, your IP address might get banned from the network administrator.
Therefore, you can’t really open ports on a router behind CGNAT. But performing CGNAT can impact specific applications ranging from server hosting to accessing remote devices. The best solution to this CGNAT issue is to get in touch with your ISP or get a dedicated IP VPN to overcome CGNAT.
Host a Server With a Dedicated IP and Port Forwarding add-on
You need a dedicated IP with a Port Forwarding add-on if you wish to host a game server, get your IP whitelisted, or want your friends to connect to your at-home devices. A Dedicated IP allows you to create servers and allow external IP addresses to connect to your server without any IP mapping issues.
Frequently Asked Questions
Not exactly. Double NAT means traffic passes through two NAT layers. CGNAT places one of those layers on the ISP’s network, where multiple customers can share the same public IPv4 address.
UPnP can open ports on your local router, but it cannot create a mapping on the ISP’s CGNAT layer. As a result, enabling UPnP alone will not make a port publicly reachable when your connection is behind CGNAT.
Sometimes. Some ISPs can move your connection off CGNAT or provide a public IPv4 address, either on request or as a paid option. Availability depends on the provider, so you will need to check what your ISP offers.
No. For standard router port forwarding, you need a publicly reachable IPv4 address, but it does not necessarily have to be static. A static IP is useful when you need the same public address to stay unchanged over time.
No. Bridge mode can remove an extra NAT layer created by your own modem or router, but it does not remove CGNAT on your ISP’s network. If your ISP still places your connection behind CGNAT, standard port forwarding will remain unavailable.
Further CGNAT Port Forwarding Guides
| Starlink CGNAT Port Forwarding | Xfinity CGNAT Port Forwarding |
| CGNAT Gaming | T-Mobile CGNAT Port Forwarding |
| Verizon Fios CGNAT Port Forwarding | CGNAT Mikrotik Port Forwarding |

PureVPN

October 5, 2026

2 days ago