If you’re running a homelab, chances are you’re hosting services like web servers, game servers, media centers, or remote access tools. But what good is a homelab if you can’t access it from outside your local network? That’s where port forwarding comes in.
Port forwarding is a networking technique that allows external devices to connect to a specific service inside your private home network. Without it, your self-hosted applications remain locked behind your router’s firewall. However, setting it up properly requires understanding a few key concepts—static IPs, router configurations, security risks, and troubleshooting.
In this comprehensive guide, we’ll walk through everything you need to know to configure port forwarding safely and effectively in your homelab.

Understanding Port Forwarding: Why It Matters
When you host a service, say a personal website or a Minecraft server, it runs on a specific port, a virtual communication endpoint. By default, your router blocks all incoming external connections as a security measure. Port forwarding tells your router:
“Hey, when someone tries to reach this specific port from the internet, send that traffic directly to [this device] on my local network.”
For example:
- If you forward port 80 to a local web server, anyone visiting your public IP will see your website.
- If you forward port 25565 to a Minecraft server, friends can join your game from anywhere.
When Do You Need Port Forwarding?
- Running a public-facing web server (e.g., a portfolio site or blog).
- Hosting game servers (Minecraft, CS:GO, Valheim).
- Accessing home automation tools (Home Assistant, Node-RED) remotely.
- Using remote desktop (RDP) or SSH to control your homelab from outside.
Step 1: Assign a Static IP to Your Homelab Device
Before setting up port forwarding, your server or device must have a static local IP address. If you rely on DHCP (automatic IP assignment), your device’s IP might change, breaking the port forwarding rule.
How to Set a Static IP
On Windows:
- Open Command Prompt and type
ipconfig /all. - Note your current IPv4 address, subnet mask, default gateway, and DNS servers.
- Go to Network Settings > Change adapter options > Properties > IPv4.
- Select “Use the following IP address” and enter the details manually.
On Linux (Ubuntu/Debian):
Edit the Netplan or network interfaces file:
bash
sudo nano /etc/netplan/01-netcfg.yaml
Add your static IP configuration:
network:
  version: 2
  ethernets:
    eth0:
      dhcp4: no
      addresses: [192.168.1.100/24]
      gateway4: 192.168.1.1
      nameservers:
        addresses: [8.8.8.8, 1.1.1.1]
Apply changes with:
bash
sudo netplan apply
Router DHCP Reservation (Recommended)
Most routers allow you to reserve an IP for a specific device’s MAC address. This ensures the device always gets the same IP without manual configuration.
Step 2: Accessing Your Router’s Port Forwarding Settings
Every router has a different interface, but the general steps are similar:
- Find your router’s IP (usually
192.168.1.1or10.0.0.1). - Log in (default credentials are often on a sticker on the router).
- Locate the port forwarding section (sometimes under “Advanced,” “NAT,” or “Firewall”).
Common Router Brand Locations
- TP-Link: Advanced > NAT Forwarding > Port Forwarding
- ASUS: WAN > Virtual Server/Port Forwarding
- Netgear: Advanced > Port Forwarding/Port Triggering
- Ubiquiti (UniFi): Settings > Routing & Firewall > Port Forward
- pfSense/OPNsense: Firewall > NAT > Port Forward
Step 3: Creating a Port Forwarding Rule
Once inside your router’s settings, you’ll need to define:
- Service Name (e.g., “Web Server” or “Minecraft”)
- External Port (the port opened to the internet, e.g.,
80for HTTP) - Internal IP (the static IP of your homelab device)
- Internal Port (the port the service runs on locally, usually same as external)
- Protocol (TCP, UDP, or both—most services use TCP)
Example: Forwarding a Web Server
| Field | Value |
|---|---|
| Service Name | Homelab Web |
| External Port | 80 |
| Internal IP | 192.168.1.100 |
| Internal Port | 80 |
| Protocol | TCP |
After saving, the rule should take effect immediately.
How to Set Up Port Forwarding in Homelab in Easy Steps
Once your internal environment is ready, it’s time to configure port forwarding on your router. Here’s how you can do it:
- Access Your Router Settings
Open a web browser and enter your router’s IP address—commonly192.168.1.1or192.168.0.1. Login using your admin credentials. - Locate the Port Forwarding Section
Depending on your router model, this section might be labeled as “Port Forwarding,” “Virtual Server,” or “NAT Rules.” - Create a New Port Forwarding Rule
You’ll be prompted to enter several fields:- Service name or label (e.g., “WebServer”)
- External port (the port that’s open on your public IP)
- Internal IP address (of your homelab server)
- Internal port (usually the same as the external one)
- Protocol (TCP, UDP, or both)
- Apply and Save Changes
Once saved, the router will start redirecting incoming traffic on that port to your internal device. - Test Your Port Forwarding
You can use online tools like canyouseeme.org to verify if the port is open and accessible.
Configure Homelab Port Forwarding with PureVPN

Here is how you can use PureVPN to port forward your Homelab in just a few clicks:
- Sign up for PureVPN, add Port Forwarding to your plan, and complete the payment.
- Download and install the PureVPN app, launch it, and log in using your credentials.
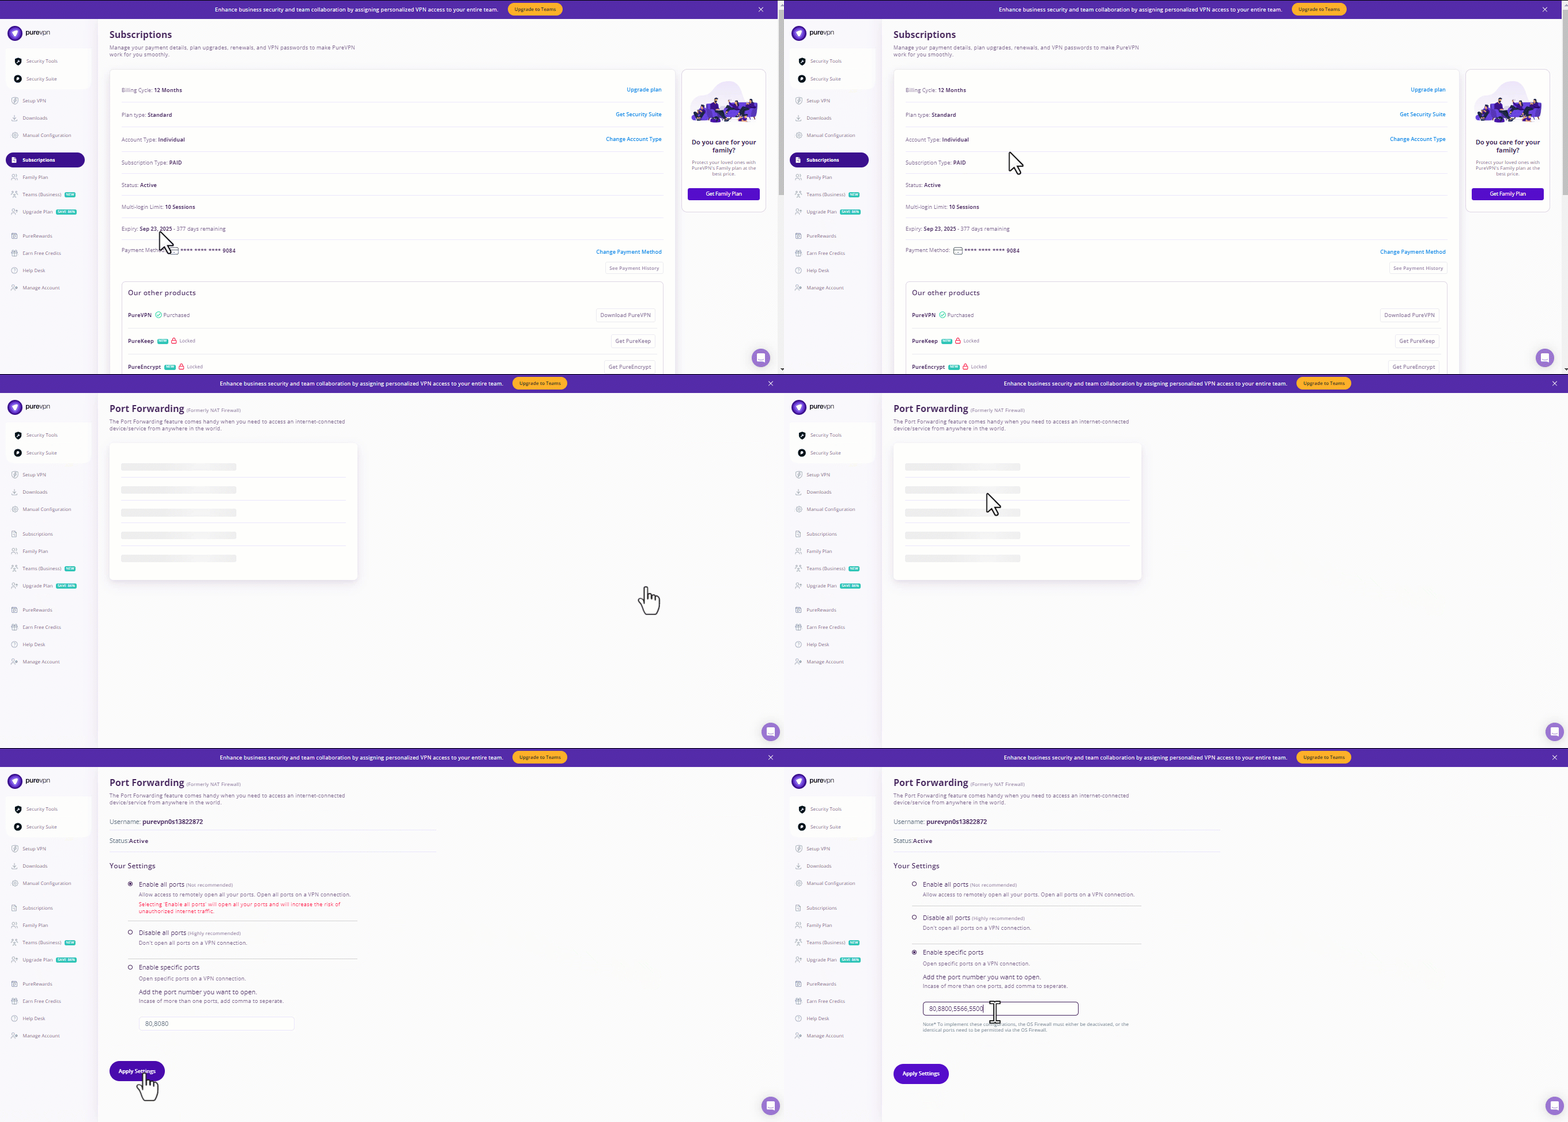
- Access the PureVPN Member Area, go to Subscriptions and click Configure next to Port Forwarding.
- Choose Enable specific ports, enter the ports you want to open, and click the Apply Settings button.
- Open the PureVPN app, connect to a port forwarding-supported server, and you are good to go!
Advanced Considerations for Complex Setups
Homelabs can become intricate, especially when dealing with nested networks, virtual machines, or containerized applications. If your homelab sits behind multiple routers, say if you have a dedicated firewall like pfSense or an ISP modem/router combo—you’ll need to forward ports across both devices. That means first forwarding the port from the outer router to the internal one, and then from the internal router to the homelab server.
You can also perform port translation—where the external port differs from the internal one. For example, you can expose port 8080 to the public while forwarding it to port 80 internally. This helps avoid conflicts with common ports already in use.
Port Forwarding for Docker and Kubernetes
In homelabs that use Docker or Kubernetes, you’ll need to account for how container networking interacts with port forwarding.
In Docker, expose ports using the -p flag when starting containers (e.g., -p 8080:80) and then configure your router to forward traffic to the host’s IP and mapped port.
In Kubernetes, things become more complex. You’ll typically expose services via Ingress Controllers or LoadBalancers. If your cluster doesn’t use a cloud provider, you can implement a tool like MetalLB to simulate external load balancing.
Security Best Practices
Port forwarding, while convenient, introduces risk by exposing internal services to the public internet. To mitigate those risks, follow these security practices:
- Limit Exposure
Only open the ports you absolutely need. Avoid forwarding default ports (like 22 for SSH) without additional safeguards. - Use SSH Keys Instead of Passwords
If you’re exposing SSH, disable password logins and enforce key-based authentication to prevent brute-force attacks. - Reverse Proxy and TLS Encryption
For web services, consider setting up a reverse proxy using tools like NGINX or Traefik. This allows you to route multiple services through a single entry point and enforce HTTPS via Let’s Encrypt. - Use a VPN Instead
PureVPN allows you to create a secure tunnel into your home network. This eliminates the need for exposing services directly via port forwarding. - Regularly Audit and Update
Keep your services and homelab devices updated. Routinely check which ports are forwarded and remove unused rules.
Conclusion
Port forwarding is a foundational technique that empowers your homelab to interact with the wider internet. While the basic configuration is relatively straightforward, maintaining security and adapting to complex network topologies requires a thoughtful approach.
By understanding your router’s capabilities, using static IPs, securing your services, and knowing when to use alternatives like VPNs or reverse proxies, you can safely expose and manage your homelab from anywhere in the world. Whether you’re hosting a personal project or simulating a mini data center, mastering port forwarding puts you one step closer to professional-grade networking.


