Crafting an anvil is one of those early Minecraft steps that quietly makes the rest of your game easier. Whether you’re repairing a favorite pickaxe, combining enchantments, or renaming items to stay organized, the anvil becomes a tool you rely on more than you expect.
But before you can use one, you’ll need to gather the right materials and understand how crafting works. Fortunately, building an anvil is straightforward once you know what to collect and where to find it, and this guide walks you through each step:
What You Need to Craft an Anvil
To build an anvil, you’ll need a decent amount of iron. The recipe uses a mix of iron blocks and iron ingots, which means gathering more materials than most early-game items require. Once you have enough, crafting the anvil is straightforward. Here’s what you need to get:
| Item | Quantity Needed | Iron Needed |
| Iron Blocks | 3 | 27 ingots |
| Iron Ingots | 4 | 4 ingots |
| Total Iron Required | — | 31 ingots |
How to Get Iron in Minecraft
Iron is one of the easiest ores to farm, but where you look is really important. You’ll find it most often in caves, mountain biomes, and underground between Y-level 15 and 56, with especially high amounts in high-altitude peaks.
Mine raw iron with a stone pickaxe or better, then smelt it in a furnace to turn it into ingots. If you want to gather materials quickly, explore exposed cliff faces, ravines, and deep cave openings as these areas usually give you enough iron for an anvil in a single run.
Step-by-Step Guide to Craft an Anvil in Minecraft
Once you have all the iron you need, crafting an anvil only takes a few seconds. Just follow these steps to build your anvil correctly:
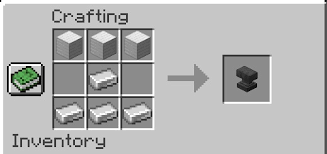
- Open your crafting table to access the 3×3 crafting grid where you’ll place each ingredient.
- Place 3 Iron Blocks across the top row, filling all three slots. This forms the base shape of the recipe.
- Put 1 Iron Ingot in the center slot of the grid. This connects the blocks to the final row of materials.
- Add the remaining 3 Iron Ingots across the bottom row, placing them in all three bottom slots.
- Take the anvil from the result box and move it to your inventory so you can place it wherever you need.
How to Use an Anvil in Minecraft
Once you place an anvil in your world, you can start using it for three main purposes:
Repairing Tools, Weapons, and Armor
Place the damaged item in the first slot and either another copy of the same item or its crafting material in the second to restore durability at the cost of a small amount of XP. Anvils are especially useful for repairing enchanted gear because they keep the enchantments intact, unlike a grindstone.
Combining or Upgrading Enchantments
Put two enchanted items, or an item and an enchanted book, into the anvil to merge their enchantments, so you can upgrade levels (like Efficiency II + Efficiency II = Efficiency III) or combine multiple enchantments into one item. The XP cost depends on prior anvil usage and enchantment levels.
Renaming Items
Anvils let you rename almost any item, from tools and weapons to armor and even certain utility blocks. Rename an item by placing it in the first slot and typing a new name in the bar above the result box. It costs just 1 XP level, and your renamed items keep that label permanently unless changed again.
Anvil XP Costs and How They Work
Every action you perform on an anvil comes with an XP cost, and that cost grows as the item is modified over time. Understanding how these values scale can help you avoid wasting levels or running into blocked actions.
Base XP Cost per Action
Every anvil action, such as repairing an item, combining enchantments, or merging books, has a base XP cost. Simple repairs and renames cost very little, while combining high-level enchantments or multiple books quickly raises the price.
Prior Work Penalty (PWP)
Each time you modify an item on an anvil, it gains a “prior work” value that makes future actions more expensive. This penalty stacks, so items you’ve repaired or upgraded several times will cost more levels the next time you use them.
The “Too Expensive!” Message
If the XP cost of an action exceeds 40 levels, Minecraft blocks it entirely and shows the “Too Expensive!” message. This usually happens when an item has been worked on too many times or when you try to combine heavily enchanted gear.
Limits on Combining Items
Some enchantments can’t be merged together, and others have strict level caps. Items with very high prior work penalties or incompatible enchantments won’t combine at all, no matter how much XP you have.
How Anvil Durability Works in Minecraft
Anvils wear down over time, and every use brings them closer to breaking. Minecraft tracks this through a few simple damage stages, and once an anvil reaches its final state, it disappears and must be crafted again.
Anvils progress through three visual stages before breaking:
| Stage | Name |
| 1 | Anvil (Undamaged) |
| 2 | Chipped Anvil |
| 3 | Damaged Anvil |
Each time you repair, combine, or rename an item, there’s a 12% chance the anvil will take damage and move to the next stage. Because this is probability-based, some anvils last a long time while others break quickly.

Other Anvil Behaviors in Minecraft
Not all anvil mechanics are tied to durability. Some behaviors affect placement, movement, or interaction with the world around it.
Anvils Fall Like Gravity Blocks
If an anvil doesn’t have a solid block underneath, it behaves like sand or gravel and falls straight down until it hits a surface. This fall can damage mobs or players it lands on, making anvils unexpectedly useful for simple traps, mob grinders, or automation setups.
Facing Direction When Placed
When you place an anvil, it automatically faces the direction your character is looking, similar to stairs or furnaces. This can help with organizing workstations, aligning builds, or creating decorative setups around your base.
Can You Repair an Anvil?
Anvils can’t be repaired once they take damage. When an anvil reaches its final stage and breaks, it disappears completely, and there’s no way to restore or rebuild it with materials. The only option is to craft a brand-new anvil using fresh iron.
Since each use has a chance to damage the anvil, some players keep multiple anvils in their base or store extra iron for replacements. If you’re using an anvil often, it’s normal to go through several anvils over the course of a survival world.
Frequently Asked Questions
If the anvil recipe isn’t showing up, it usually means you don’t have the correct materials placed in the crafting grid. You need 3 Iron Blocks in the top row and 4 Iron Ingots in the exact center and bottom slots. Make sure you’re using a crafting table, not the 2×2 inventory grid.
Anvils don’t have a fixed number of uses. Instead, every action has a 12% chance to damage the anvil and move it to the next stage. Because it’s random, some anvils break quickly while others last much longer.
This message appears when the XP cost of an action goes over 40 levels. Minecraft blocks the operation entirely, which usually happens when an item has been combined many times or carries several high-level enchantments.
Yes. A falling anvil acts like a heavy block and can deal damage to anything it lands on. It can also break certain blocks beneath it, which is why some players use anvils as part of traps or mob grinders.
You can move an anvil by mining it with a pickaxe. Harvesting doesn’t damage it or affect its durability stage, it keeps its current condition when picked up and placed again.
How to make an anvil in minecraft is important for repairing items, combining enchantments, and renaming tools.
How to make an anvil in minecraft requires 3 iron blocks and 4 iron ingots crafted in the crafting table.
Arsalan Rashid
January 29, 2026
4 weeks ago