Imagine having your entire collection of movies, TV shows, music, and home videos, perfectly organized and streamable to any device, anywhere in the world. That’s the promise of Jellyfin, the fantastic open-source media server that puts you in complete control of your entertainment. No subscriptions, no ads, just your media, your way.
But like many powerful self-hosted applications, truly unlocking Jellyfin’s “anywhere” potential often requires navigating a common networking hurdle: port forwarding. For many aspiring home media moguls, this phrase can sound like a daunting technical challenge, a barrier between their couch and their content while on vacation. However, understanding and implementing port forwarding for your Jellyfin server is a fundamental step to transforming your living room setup into a global media hub.
This comprehensive guide aims to demystify Jellyfin port forwarding. We’ll explore exactly what it is, why it’s absolutely essential for remote access, and provide you with the knowledge and steps to confidently configure your network, ensuring your personal media library is always just a click away, no matter where life takes you.

Table of Contents
What Is Port Forwarding and Why Does Jellyfin Need It?
Before diving into the technical steps, let’s understand what port forwarding actually does.
What Is Port Forwarding?
Port forwarding is a networking technique that allows external devices to connect to a specific service (like Jellyfin) running on your home network. Normally, your router acts as a gatekeeper, blocking outside access to devices inside your home.
By setting up port forwarding, you tell your router:
“Hey, if someone tries to connect on port 8096 (Jellyfin’s default port), send them straight to my media server!”
Default Jellyfin Ports (Important)
| Purpose | Protocol | Default Port |
|---|---|---|
| Jellyfin web dashboard & streaming (HTTP) | TCP | 8096 |
| Jellyfin secure access (HTTPS, if configured) | TCP | 8920 |
Why Jellyfin Needs Port Forwarding
Enabling port forwarding for your Jellyfin server isn’t just a technical tweak; it’s the key to truly leveraging the power of your personal media cloud.
Optimized Performance: Direct connections often lead to lower latency and better streaming performance, especially for high-bitrate content. Your data travels directly from your server to the client, minimizing hops and potential bottlenecks.
Remote Access, Truly Anywhere: This is the primary benefit. With port forwarding, you can stream your media from anywhere with an internet connection. On a business trip? Catch up on your favorite show. At a friend’s house? Share your latest home videos. The possibilities are endless.
Sharing with Trusted Friends and Family: Want to share your meticulously curated movie collection with a few close friends or family members? Port forwarding makes it possible for them to access your server from their own homes, provided you give them the necessary credentials.
Robust and Reliable Connections: While there are alternative methods for remote access (like VPNs or reverse proxies), direct port forwarding often offers the most straightforward setup and can provide a more reliable and faster connection for streaming, especially for users who aren’t tech-savvy with VPN clients.
Full Control, No Third Parties: Unlike commercial streaming services that dictate what you can watch and when, Jellyfin with port forwarding gives you complete autonomy. Your media, your rules, accessible on your terms. You’re not relying on a third-party server to relay your traffic, which can sometimes introduce latency or data caps.
The Technical Blueprint: Components and Considerations
Before we dive into the step-by-step process, let’s quickly review the key players in this network configuration:
- Your Router: The central hub of your home network, connecting your devices to the internet and acting as your primary firewall.
- Your Jellyfin Server: The computer or device running the Jellyfin software (e.g., a Windows PC, a Linux server, a Network Attached Storage (NAS) device).
- Internal IP Address: The unique address your router assigns to your Jellyfin server within your home network (e.g.,
192.168.1.150). - External IP Address (Public IP): The unique address assigned to your router by your Internet Service Provider (ISP). This is the address the outside world uses to find your home network.
- Port 8096 (TCP): Jellyfin’s default communication port. You must know the port your Jellyfin server is using. You can check this in Jellyfin’s settings, under “Networking.”
How to Set Up Jellyfin Port Forwarding (Step-by-Step)
While router interfaces vary, the core principles remain the same.
Step 1: Identify Your Jellyfin Server’s Internal IP Address
Your router needs to know which device on your local network to send Jellyfin traffic to. It’s crucial that this IP address doesn’t change.
- Go into your router’s settings (often under DHCP Reservation or Static Leases) and assign a static internal IP address to the device hosting your Jellyfin server (using its MAC address). Alternatively, you can manually configure a static IP directly on your server machine’s network adapter settings.
- How to find current IP:
- Windows: Open Command Prompt (
cmd), typeipconfig. Look for “IPv4 Address” under your active network adapter. - macOS: System Settings > Network, select your active connection.
- Linux: Open a terminal, type
ip aorhostname -I.
- Windows: Open Command Prompt (
Step 2: Access Your Router’s Administration Panel
- Open a web browser and type your router’s default gateway IP address into the URL bar (e.g.,
192.168.1.1,192.168.0.1,10.0.0.1). This is often listed as “Default Gateway” when you runipconfig. - Login: Enter your router’s username and password. If you haven’t changed them, check the sticker on your router or search for your router model’s default credentials online.
Step 3: Locate the Port Forwarding Section
Router interfaces differ wildly. Look for sections labeled:
- “Port Forwarding”
- “NAT (Network Address Translation)”
- “Virtual Servers”
- “Firewall”
- “Advanced Settings”
Step 4: Create a New Port Forwarding Rule for Jellyfin
This is the core configuration. You’ll need to input:
- Service Name: “Jellyfin Server” (or similar)
- External Port / WAN Port / Start/End Port:
8096(or your custom Jellyfin port). If your router uses a range, enter8096for both start and end. - Internal Port / Local Port:
8096(or your custom Jellyfin port). This should almost always be the same as the external port. - Protocol: TCP (Jellyfin primarily uses TCP for streaming).
- Internal IP Address (or Device IP): Enter the static internal IP address of your Jellyfin server you identified in Step 1.
- Enable/Save: Ensure the rule is active and save your changes.
- Restart Router: A quick reboot can ensure the new rules are applied.
Step 5: Configure Your Server’s Software Firewall
Even after router configuration, your computer’s built-in firewall might block the connection.
- Windows (most common):
- Search for “Windows Defender Firewall with Advanced Security” and open it.
- Click “Inbound Rules” > “New Rule…”
- Select “Port” > “TCP” > “Specific local ports:”
8096. - Choose “Allow the connection.”
- Select profiles: “Domain,” “Private,” and “Public” (for maximum reach).
- Name it “Jellyfin” and finish.
- Important: Ensure your Jellyfin server application (often
Jellyfin.Service.exeorJellyfin.exe) is also allowed through the firewall.
- Linux (e.g., Ubuntu with UFW):
sudo ufw allow 8096/tcpsudo ufw enable(if firewall is not already active)
- macOS: System Settings > Network > Firewall > Options. You’ll typically need to allow “Jellyfin Media Server” application.
Step 6: Test Your Port Forwarding and Remote Access
- Online Port Checker: Use a website like
canyouseeme.org. Enter your public IP address (which the site usually detects) and the port8096. A “Success” or “Open” message means your router is forwarding correctly. - Test from Outside Your Network: The ultimate test. Use your phone on mobile data (not Wi-Fi) or a computer at a friend’s house.
- Open the Jellyfin app or a web browser.
- Enter your public IP address followed by the port (e.g.,
http://[your.public.ip.address]:8096). - If you set up DDNS, use your DDNS hostname (e.g.,
http://yourserver.duckdns.org:8096). - If Jellyfin loads, congratulations!
The Dynamic IP Challenge and How to Solve It
One common hurdle with port forwarding is the “dynamic IP address.” Most residential ISPs assign you a public IP address that can change periodically (e.g., every 24 hours, or after a router reboot). If your public IP changes, your friends won’t be able to find your server anymore using the old address.
The solution to this is a Dynamic DNS (DDNS) service. DDNS providers offer a free hostname (e.g., yourserver.duckdns.org) that automatically updates to point to your current public IP address whenever it changes.
- Action: Sign up for a free DDNS service.
- Configure DDNS on your Router: Many modern routers have built-in DDNS client support. You’ll enter your DDNS provider details, username, and hostname.
- Configure DDNS on your Server (if router doesn’t support it): If your router lacks DDNS support, you can run a small client application on your Jellyfin server that periodically updates your DDNS hostname.
- Why this matters: DDNS ensures your Jellyfin server is always reachable by a memorable hostname, even if your public IP changes. Your friends will connect to
yourserver.duckdns.orginstead of a fluctuating IP address.
Connect to PureVPN’s Port Forwarding to Access Jellyfin

A lot of ISPs (internet service providers) now perform CGNAT (Carrier-grade Network Address Translation) so they can conserve bandwidth and assign a single IP address to more than one user on their network. But CGNAT is bad for port forwarding because it makes it difficult to open ports on your router.
There is a way to get around the CGNAT issue. Yes, you guessed it right. It’s by using PureVPN’s Port Forwarding add-on. Here’s how you can make it work:
- Sign up for PureVPN, add Port Forwarding to your plan, and complete the payment.
- Download and install the PureVPN app, launch it, and log in using your credentials.
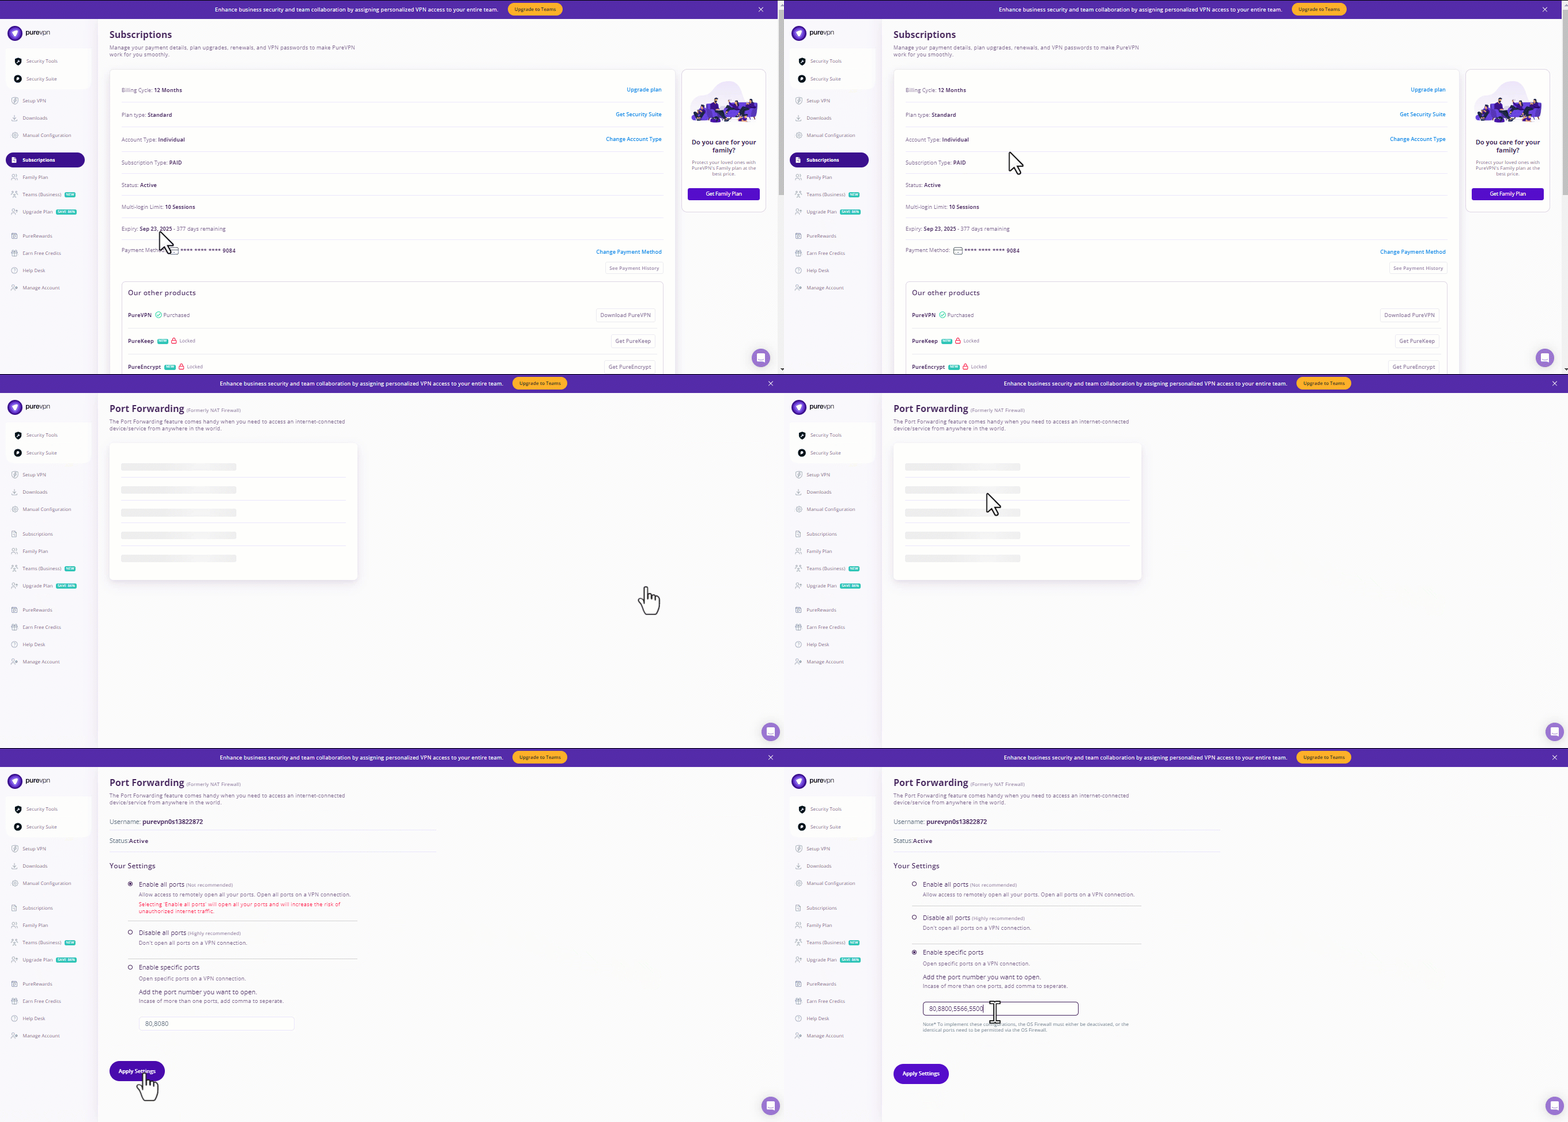
- Access the PureVPN Member Area, go to Subscriptions and click Configure next to Port Forwarding.
- Choose Enable specific ports, enter the ports you want to open, and click the Apply Settings button.
- Open the PureVPN app, connect to a port forwarding-supported server, and you are good to go!
Final Thoughts: Is Direct Port Forwarding Worth It?
Port forwarding is fast, straightforward, and perfect for first-time remote access. But it carries risk—exposing your login screen to the world without encryption.
For a better long-term solution:
- Pair port forwarding with HTTPS on port 8920
- Or use a reverse proxy
- Or skip it all and go through a VPN, offering a private, encrypted tunnel
All three methods work, but each trades simplicity for security. Choose based on your comfort with networking and how widely you want to share access.


