
Table of Contents
Introduction
Have you ever tried to host a game server, access your Plex or Jellyfin media library, or connect to your home network remotely, only to be blocked by your TP-Link Deco? This happens because Deco routers, like most modern networking devices, use NAT (Network Address Translation) to protect your home network. While NAT enhances security, it also prevents external devices from connecting directly to your devices without explicit permission.
The solution is port forwarding, which tells your Deco exactly which incoming connections from the internet should be routed to specific devices inside your home network. In this guide, we’ll walk you through the entire process, explain key concepts like DMZ and UPnP, provide real-world examples for gaming and media servers, and troubleshoot common issues.
By the end of this post, you’ll know how to safely and efficiently configure port forwarding on your TP-Link Deco.
How to Port Forward Deco TP-Link Router with PureVPN

Opening ports on your TP-Link router does not have to be a hassle. With PureVPN’s Port Forwarding add-on, it is as simple as 1,2,3. Here is how you can do it:
- Sign up for PureVPN, include the Port Forwarding add-on to your plan, and complete the payment.
- Download and install the PureVPN app for your device, launch it, and log in using your credentials.
- Access the PureVPN Member Area, go to Subscriptions and click Configure next to Port Forwarding.
- Choose Enable specific ports, enter the ports you want to open, and click the Apply Settings button.
- Open the PureVPN app, connect to a port forwarding-supported server, and you are good to go!
Understanding Port Forwarding on TP-Link Deco
Port forwarding allows devices outside your network to communicate with specific devices inside your home. Your Deco acts as a gatekeeper, blocking unwanted traffic while allowing approved connections to reach the designated device.
Deco provides three main ways to manage incoming connections:
- Port Forwarding (NAT Forwarding): You manually assign ports to specific devices. This method is the most secure and precise.
- UPnP (Universal Plug and Play): Automatically opens ports when applications require them. Commonly used for consoles and gaming.
- DMZ (Demilitarized Zone): Exposes a device to all incoming traffic. Useful for testing but less secure.
Understanding the difference ensures you choose the right method for your needs.
Related Read: A Step-by-Step Guide for TP-Link Router Port Forwarding
What You’ll Need Before Forwarding Ports
To successfully forward ports, prepare the following:
- Device Requiring Port Access: This could be a gaming PC, console, media server (Plex/Jellyfin), NAS, CCTV DVR, or a computer for remote desktop.
- Device’s Internal IP Address: Example:
192.168.68.120. You can find this in Deco’s connected devices section. - Ports to Open: Different apps use different ports. Examples: Minecraft (25565), Plex (32400), Jellyfin (8096), HTTP (80), FTP (21).
- Public IP Address: Ensure your ISP isn’t using CGNAT. If your WAN IP is private (10.x.x.x or 100.x.x.x), port forwarding won’t work unless you request a public IP or use alternative solutions.
Step-by-Step: Setting Up Port Forwarding on TP-Link Deco
TP-Link Deco supports models like M4, M5, X20, X50, X60, X68, XE75, BE series, and PX50. The steps below work for all.
Step 1: Open the Deco App
Available on Android and iOS. Log in with your TP-Link ID and ensure your Deco network is online. All port forwarding actions are handled through this app, as Deco lacks a traditional web interface.
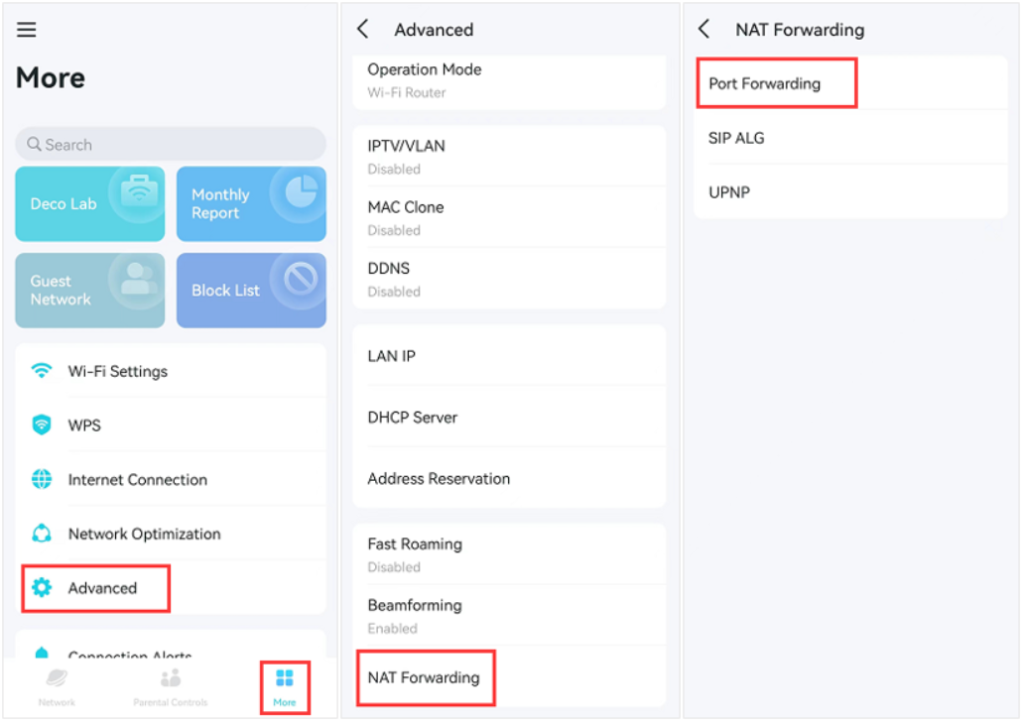
Step 2: Navigate to NAT Forwarding
- Tap More in the bottom menu.
- Select Advanced.
- Tap NAT Forwarding, where you’ll find Port Forwarding, UPnP, and DMZ.
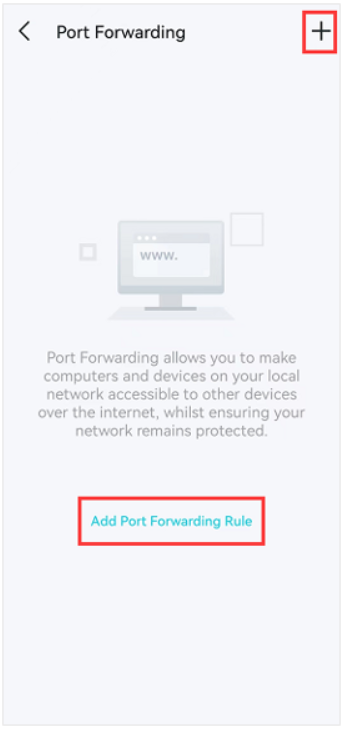
Step 3: Create a New Port Forwarding Rule
- Tap Create or +.
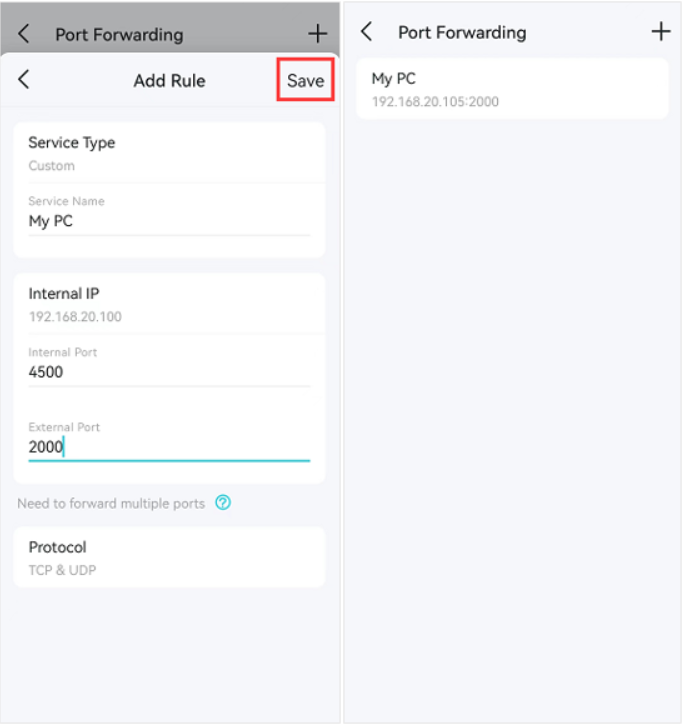
- Enter details:
- Service Name: e.g., Minecraft
- Internal IP: Device’s IP, e.g., 192.168.68.120
- Internal Port: Port used by your device
- External Port: Port visible to the internet
- Protocol: TCP, UDP, or Both
Save the rule. Your Deco will now forward incoming traffic to your device.
Step 4: Assign a Static IP to Your Device
Dynamic IPs can change, breaking your port forwarding rules. In Deco:
- Go to More → Advanced → Address Reservation.
- Select your device.
- Assign a fixed IP.
This ensures your port forwarding rule always points to the correct device.
Step 5: Test Your Ports
Use tools like CanYouSeeMe.org or PortChecker.io. Make sure the target service is running when testing; otherwise, ports may appear closed.
Examples of Port Forwarding for Common Use Cases
1. Plex Media Server (Port 32400)
For Plex port forwarding, forward TCP port 32400 to your Plex server’s internal IP. This allows you to stream your media library from anywhere. Plex should indicate Remote Access: Fully Accessible once correctly configured.
2. Jellyfin (Port 8096)
For Jellyfin Port Forwarding, forward TCP port 8096 to access your Jellyfin server remotely. If SSL is enabled, also forward port 8920 for HTTPS.
3. CCTV/IP Camera DVR
DVRs often require multiple ports:
- Web access: 80
- RTSP streaming: 554
- Device control: 37777
Add separate rules for each port to ensure full functionality.
4. Gaming Servers
- Minecraft Port Forwarding: TCP/UDP 25565
- GTA V Port Forwarding: TCP 6672, UDP 61455–61458
- Valorant Port Forwarding: CP 443, UDP 7000–8000, UDP 10000–10099
For consoles, UPnP can often handle automatic port opening.
5. Remote Desktop (RDP, Port 3389)
Forward TCP port 3389 to connect remotely. For security, consider changing the external port and using a VPN.
Why is TP Link Deco Port Forwarding Not Working and How to Fix Them
Double NAT
If Deco is behind another router, incoming connections may not reach it. Solutions:
- Enable Access Point mode on Deco.
- Put the ISP router in Bridge mode.
- Forward ports on both routers (less ideal).
ISP Uses CGNAT
If your WAN IP is private, port forwarding will fail. Options include requesting a public IP or using cloud tunneling services like Tailscale, ZeroTier, or Cloudflare Tunnel. VPNs with port forwarding add-ons, like PureVPN, can also help.
Firewall or Service Issues
- Ensure your device’s firewall allows incoming traffic.
- Ports only appear open if the service is running.
- Some ISPs block common ports—switch to alternative ports if needed.
Port Forwarding vs DMZ vs UPnP
- Port Forwarding: Manual, secure, precise—best for servers and critical apps.
- DMZ: Exposes one device entirely—use cautiously.
- UPnP: Automatic, convenient for gaming—less secure.
Security Tips
- Avoid exposing sensitive ports like RDP or SSH without a VPN.
- Change default ports to reduce attack risk.
- Use strong passwords and WPA3 Wi-Fi encryption.
- Enable firewall rules where possible.
Frequently Asked Questions (FAQ)
Go to More → Advanced → NAT Forwarding.
No. You’ll need a public IP or a VPN/tunneling solution.
Go to More → Advanced → Address Reservation, select your device, and assign a fixed IP.
Port Forwarding is secure and manual, DMZ exposes a device fully, UPnP opens ports automatically.
Check your device’s firewall, ensure the service is running, verify the internal IP, and confirm your ISP isn’t blocking the port.
Conclusion
Port forwarding on TP-Link Deco might seem daunting at first, but with the right knowledge and steps, it’s straightforward. Whether hosting game servers, streaming media, accessing security cameras, or connecting remotely, this guide equips you to open ports safely and troubleshoot common issues. By understanding Deco’s NAT system, assigning static IPs, and testing ports, you can fully unlock your network’s potential while keeping it secure.
PureVPN
November 18, 2025
4 months ago


