If you’re using WeLink internet service, you might encounter difficulties accessing devices inside your network remotely, whether it’s a media server, security camera, or home automation hub. Port forwarding is the bridge that allows specific external traffic to reach internal services safely and intentionally. This guide demystifies WeLink port forwarding using a universal, friendly tone without getting bogged down in niche router terminology.

What Is Port Forwarding and Why It Matters
Port forwarding, also known as port mapping, redirects incoming internet traffic on a specified port to a local device inside your private network. It’s like telling your router: “When data arrives at port 8080 from online, send it to my camera at IP 192.168.2.2 on port 80.”
This setup opens services like remote access to home servers, video feeds, or custom tools while preventing unnecessary exposure. It relies on the principle of Network Address Translation (NAT), preserving internal IP privacy but enabling select external connections.
How to Port Forward on WeLink Using PureVPN
Using PureVPN’s Port Forwarding add-on, you can open ports on your WeLink easily and securely. The add-on is designed to avoid any restrictions imposed by your ISP and CGNAT, making port forwarding simple!
Follow the steps below to start port forwarding on your WeLink today.

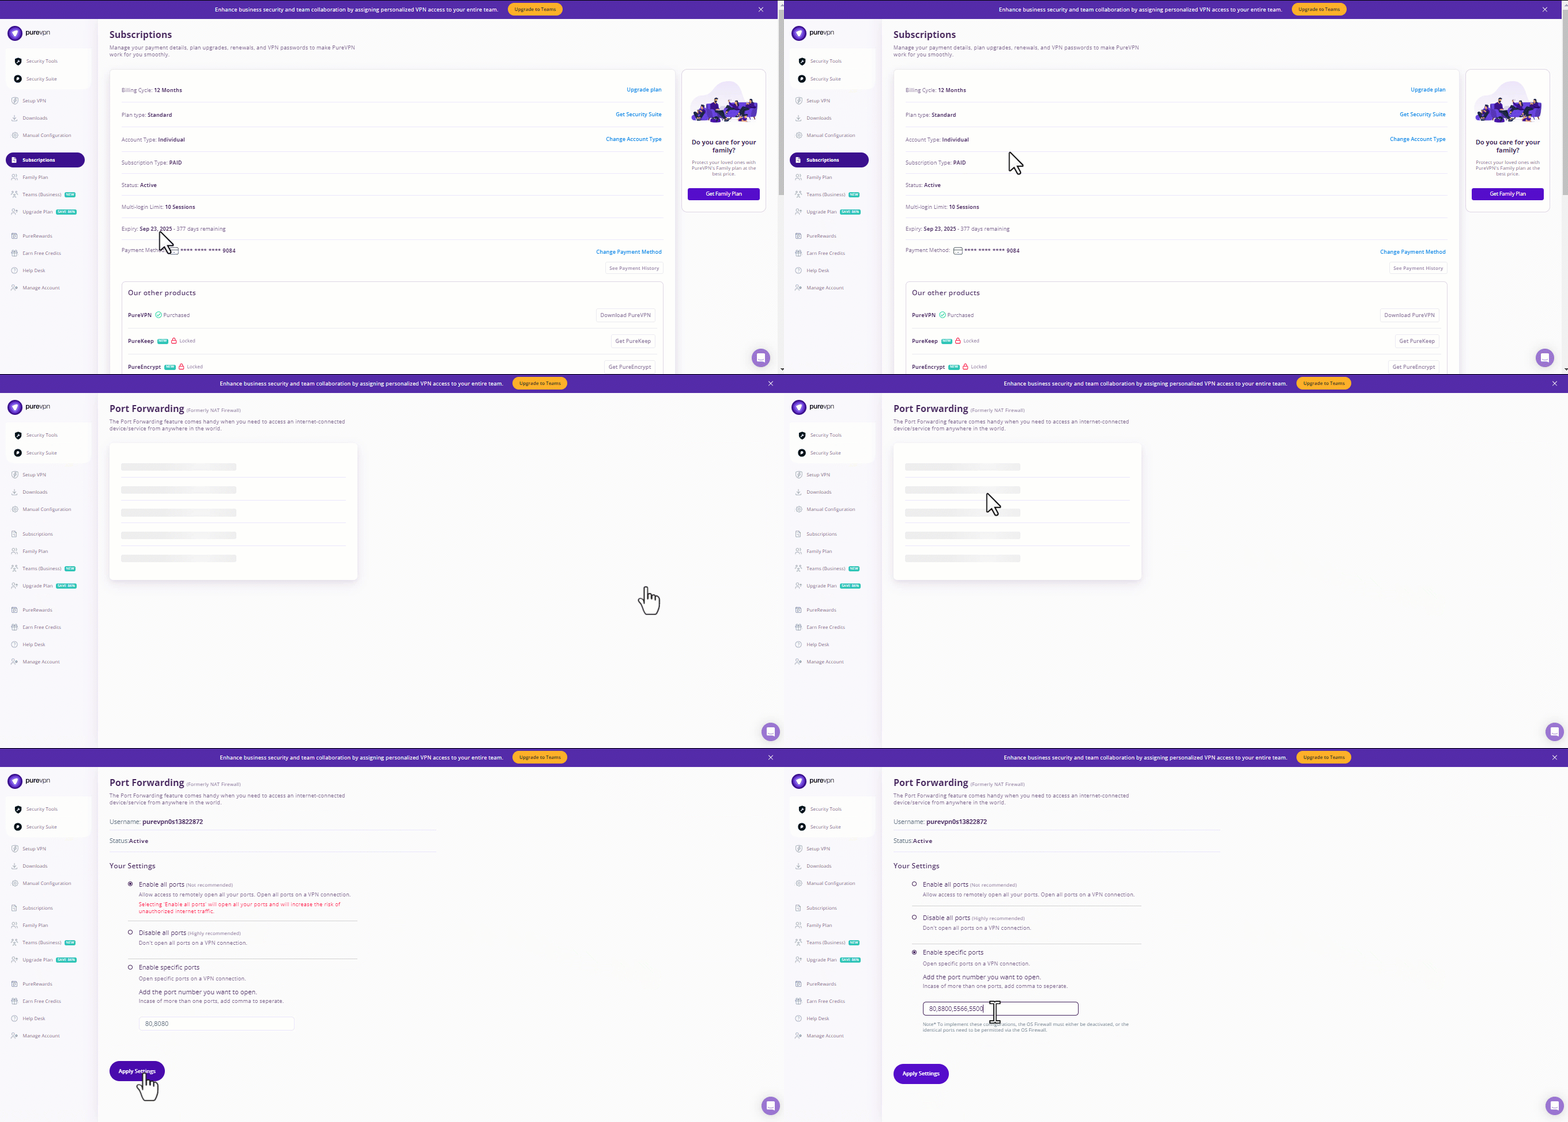
- Subscribe to PureVPN and download the app on your device.
- Log in to your PureVPN account.
- Navigate to the “Subscription” section.
- Click on “Configure” and then select “Enable Specific Ports.”
- Customize your port settings by entering the appropriate port numbers.
- Finally, save your changes by clicking “Apply Settings.”
Practical Uses of Port Forwarding
Here are some practical use cases:
- Home automation or dashboards (e.g., view your home camera feed remotely)
- Personal media servers (access Plex, Jellyfin, or Nextcloud from anywhere)
- Remote administration of home devices without installing a VPN
- Development or testing, host web services for testing across locations
Yet, users on WeLink often report that forwarding isn’t straightforward. That’s because WeLink typically operates behind Carrier-Grade NAT (CGNAT), meaning your router doesn’t have a unique public IP.
Related Read: How to Check if Your ISP Performs CGNAT
Step-by-Step: How to Set Up Forwarding on WeLink
Step 1: Secure a Public or Static IP
Since WeLink’s default setup often prevents port forwarding via CGNAT, many users must request a static public IPv4 address, typically for an extra monthly fee.
Step 2: Reserve a Local IP for the Device
Assign a static local IP or use DHCP reservation to ensure consistency. Example: your media server holds 192.168.4.50.
Step 3: Configure Port Forwarding (or Request via Support)
If your WeLink setup allows interface access, you’d typically navigate to NAT / Port Mapping / Firewall → Add Rule, specifying:
- External Port (what users will connect to)
- Internal IP & Port
- Protocol (TCP, UDP, or Both)
- Optionally, set a source IP range and description for clarity.
In reality, many WeLink users ask customer support to set this up for them.
Step 4: Verify Port Forwarding
Test public accessibility using tools like canyouseeme.org. If it fails, double-check port mapping and IP settings.
If it still doesn’t work, CGNAT may still block it, requiring VPN or tunneling alternatives.
Community Insights & Challenges
From the WeLink user communities, common themes emerge:
- CGNAT restrictions—forwarding fails without a public IP
- Delays in activation—static IPs may take several days to propagate
- Port-forwarding indirectly supported when ISP intervenes to map the WAN side
Enhancements: Port Triggering vs. Port Forwarding
Port triggering enables temporary access only when your local device initiates the outgoing traffic. Useful for dynamic tasks like FTP or certain game invites, it’s auto-managed and closes after activity ends.
Compared to static forwarding, port triggering improves security and reduces manual config risk.
Security Considerations
Port forwarding opens access. To stay secure:
- Forward only needed ports, not DMZ.
- Use firewall filters or IP whitelists when possible.
- Consider combining port forwarding with VPN encryption for sensitive services.
WeLink Port Forwarding in a Glance
| Challenge | Solution |
|---|---|
| CGNAT blocking public IP access | Request a static public IPv4 from WeLink |
| Port forwarding doesn’t work | Verify mappings, support activation delays |
| Security concerns | Restrict source IPs, consider VPN or use port triggering |
| No router interface access | Use ISP support for rule entry or VPN-based tunneling |
How to port forward on WeLink routers:
Request a static public IPv4, reserve a local static IP for your device, and create port-mapping rules to forward external ports to internal services. If CGNAT prevents direct access, consider PureVPN that helps you to get around CGNAT.
Final Thoughts
WeLink port forwarding isn’t plug-and-play but it’s still achievable with smart steps. Whether you’re aiming to host a private service, build a media hub, or remotely manage your home tools, knowing the hurdles (static IP, CGNAT) and having fallback options (VPN, port triggering) lets you reclaim control of your network.


