Table of Contents
Proxy servers are intermediaries that come in the way between your computer and the rest of the internet.
This helps to increase secrecy and prevent malicious attacks on your computer, hence giving you a better and faster connection to the net.
To enjoy these benefits, you can set up a proxy server on your Windows PC, Mac, or web browser. In this article, we will tell you how to change the Windows proxy settings and why you must do that.

How to Find Proxy Settings on Your Windows
Find Proxy Settings on your Windows computer before setting up a proxy server, follow these steps:
1. Locate Start in the Start menu, then Settings (the gear icon).
2. Select Network & Internet.
3. On the left panel, click on Proxy.
4. This includes information on auto-proxy settings and manual proxy settings.
Set up a Proxy Server on Windows 8 or Windows 10 by Default
1. To open the Windows Setting Menu, simultaneously press the Windows key + I button.
2. To be on Windows 10, go to Settings > Network & Internet > Proxy. To access Network Proxy in Windows 8, click “Settings” and “Network Proxy.”
3. Locate the “Manual Setup” section and click the switch to enable a proxy server. Also, turn on the “Automatically detect settings” switch.
4. Windows will detect proxy servers in the configuration your company, school, or community may use to facilitate secure communication. The window will be mentioned by name and will guide you during installation if it is discovered.

5. If Windcane identifies a PAC file, switch on the Use Setup Script option for the Automatic Proxy Setup.
6. To automatically set proxy server configuration in Windows 10, type in the script location and press Save.
Well done! Everything is installed correctly, and now you can enjoy working with your proxy.
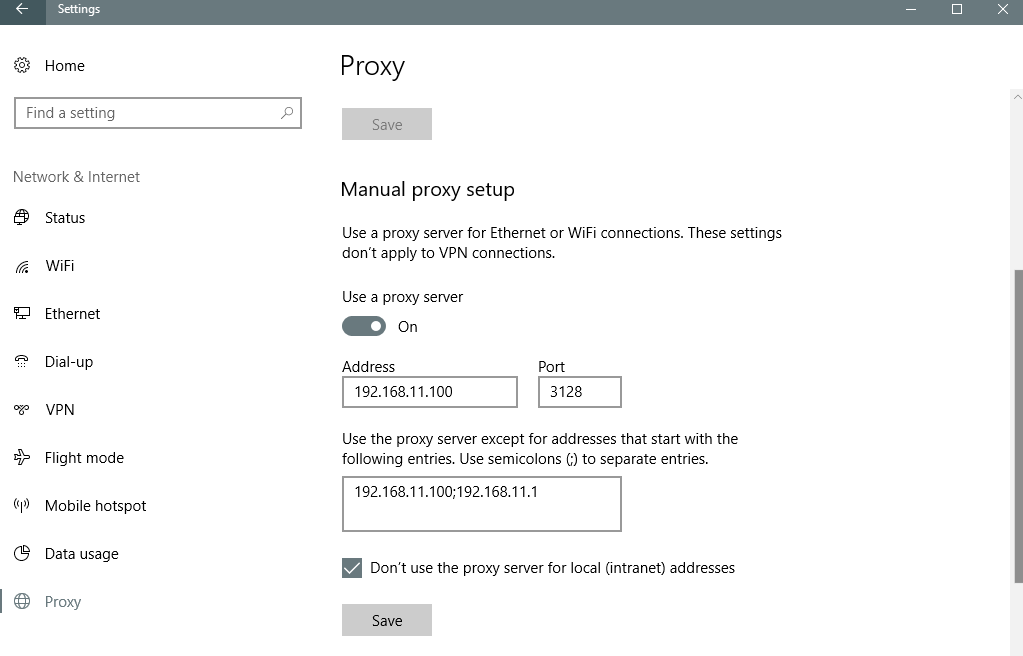
How to Manually Set Up a Proxy in Windows 8 or Windows 10
However, not all organizations install the procedure by default. You can set up a manual proxy for Windows 8 and 10.
- Using the Windows + I keys simultaneously opens the Windows Settings menu.
- First, go to settings, network, work, and internet before clicking on proxy on Windows 10. On a Windows 8 machine, go to Settings > Network Proxy.
- Go to Manual proxy setup, and click the “On” button next to “Use a Proxy Server.”
- On the top box, enter the name of the proxy server or its IP address. Type in the number of proxy ports into the port field. These are available from your IT support technician.
- Select “Proxy server requires password” if the proxy server is password-protected.
- Type in your username and password in the required field.
- Click Save.
There you have it. Now, you can already use your proxy server on Windows. The following time when you shall access the internet, it will be through a proxy server.
How To Set Up a Proxy Server on a Mac Running macOS
To set up a proxy server on a Mac running macOS, follow these steps:
1. Locate the Apple menu on your device and click on it to open System Preferences.
2. you can click the Network icon and adjust your connectivity settings.
3. Choose from one of the available networks – usually ethernet or Wi‐fi.
4. Click on advanced and go to the proxy tab.
To configure automatic proxy server settings:
1. Choose Auto Proxy Discovery.
2. Select Secure Web Proxy (HTTPS), and feed the name and address together with the port number of the chosen proxy server into the corresponding slots of the right column.
To Use a Proxy Auto-Configuration (PAC) File:
1. Select Automatic Proxy Configuration.
2. Type the proxy address in the browser window’s address bar.
If the Proxy Server Requires a Password:
1. Tick the “The proxy server requires a password checkbox.”
2. Type your account name and password in the spaces provided for Username and Password, respectively.
3. OK is the button to save the proxy setup for browsing the net.
Configuring Proxy in Google Chrome
By design, Chrome will use your macOS or Windows Proxy. To change your proxy settings from within Chrome, you can follow these steps:
- Click on the Google Chrome and choose the settings option.
- Navigate to the end of the screen to the very bottom.
- Click on Show Advanced Settings.
- Under “System,” click on “Proxy”.
- Select “Set up your proxy manually.”
- Set Chrome proxy server settings.
- Finally, return to the operating system’s proxy setting instructions and implement them to complete the necessary proxy server setup procedure.
Briefly, all you are doing is completing the initial steps on the browser and finishing the remaining ones on your OS system.
How to Set Up a Proxy Server in Safari
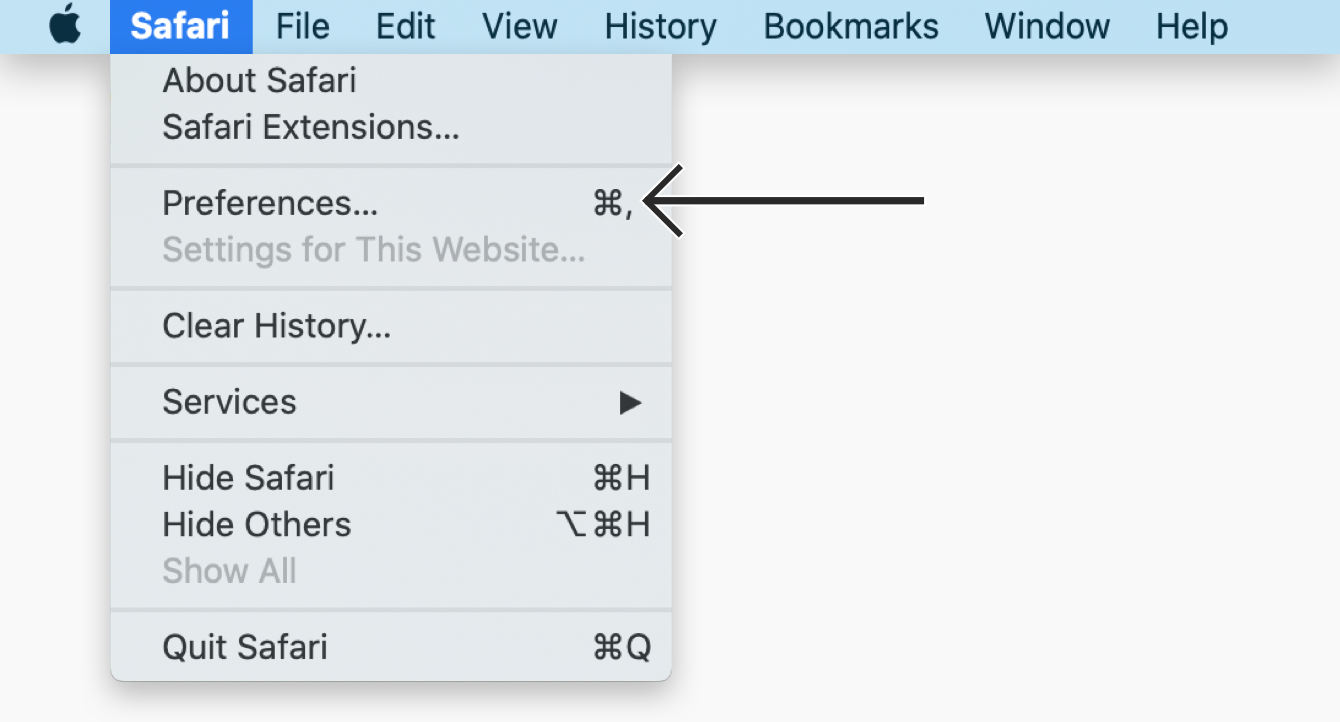
Like Chrome, Safari’s default setting is to mimic the proxy configuration in your operating system. Here’s how to change your proxy settings from within Safari:
- Start Safari in a browser toolbar.
- Choose Preferences.
- Click on the Advanced tab.
- Under “Proxies,” click Change settings.
- Finally, go back to the macOS setup procedure outlined above for setting your proxy server, then observe the instructions to accomplish that.
Along with Proxy, Secure Yourself with PureVPN
Large organizations will mainly find proxy servers useful. Nonetheless, it takes some effort to establish them; this is usually a matter delegated to network administrators and information technology personnel.
Other than that, the proxy is a traditional method of securing your communication. Modern problems call for modern solutions. To elevate the security of your virtual network, you should use a VPN.
With one touch of a button, you get encryption that makes you anonymous online to protect you from anyone finding out about your sensitive personal information, including online banking transactions, health data, etc., or peeping into your private images.
We recommend you use PureVPN while playing games. PureVPN is the most reliable and versatile option out there. It protects you from viruses and malware by building a tunnel to exchange data from your location to the destination server.
Furthermore, PureVPN has built-in ad-blocking features to block those intrusive and malicious advertisements.
Marrium Akhtar
December 22, 2023
5 months ago