If you own a Netgear router running the Genie firmware interface, enabling port forwarding is a game‑changer. Whether you’re hosting a game server like Minecraft, setting up remote desktop access, or streaming IP camera video feeds, properly configuring port forwarding allows external requests to reach your designated internal devices. In this guide, we cover what Genie port forwarding is, How to configure it, security best practices and troubleshooting.

What Is Port Forwarding on Netgear Genie?
At its core, port forwarding maps specific incoming ports like TCP/UDP 80, 8080, 25565 to an internal IP address inside your network. Netgear’s Genie user interface (common on models like WNR3500Lv2 or DGND4000) provides a step-by-step wizard to define custom services and inbound rules.
This process breaks through NAT (Network Address Translation), allowing the router to know: “If traffic arrives on this port, send it to this exact internal device.”
Why Use Genie Port Forwarding?
Here’s why port forwarding is critical for many home users:
- Gaming servers: Host Minecraft, Terraria, or console services (Xbox Live, PSN) that demand specific ports.
- Remote access: Connect to desktops, NAS devices, or CCTV systems from anywhere.
- Media and file servers: Share Plex, FTP, or web servers running on local machines.
- Enhanced control: Genie gives you service-by-service granularity, safer than UPnP.
How PureVPN Helps You For Netgear Genie Port Forwarding

Setting up port forwarding on a Netgear router is not a piece of cake. It can be made trickier for some users courtesy of ISPs or firewalls blocking some ports.
Moreover, you might also need help with significantly distinct user interfaces on different routers with difficult-to-find settings. However, you can easily set up port forwarding on any router with PureVPN’s port forwarding add-on.
You can use this add-on to block ports, allow specific ports on all your devices, and open a few ports of your choice. The add-on also hides your IP address, so your IP address isn’t blacklisted when trying to open ports behind CGNAT.
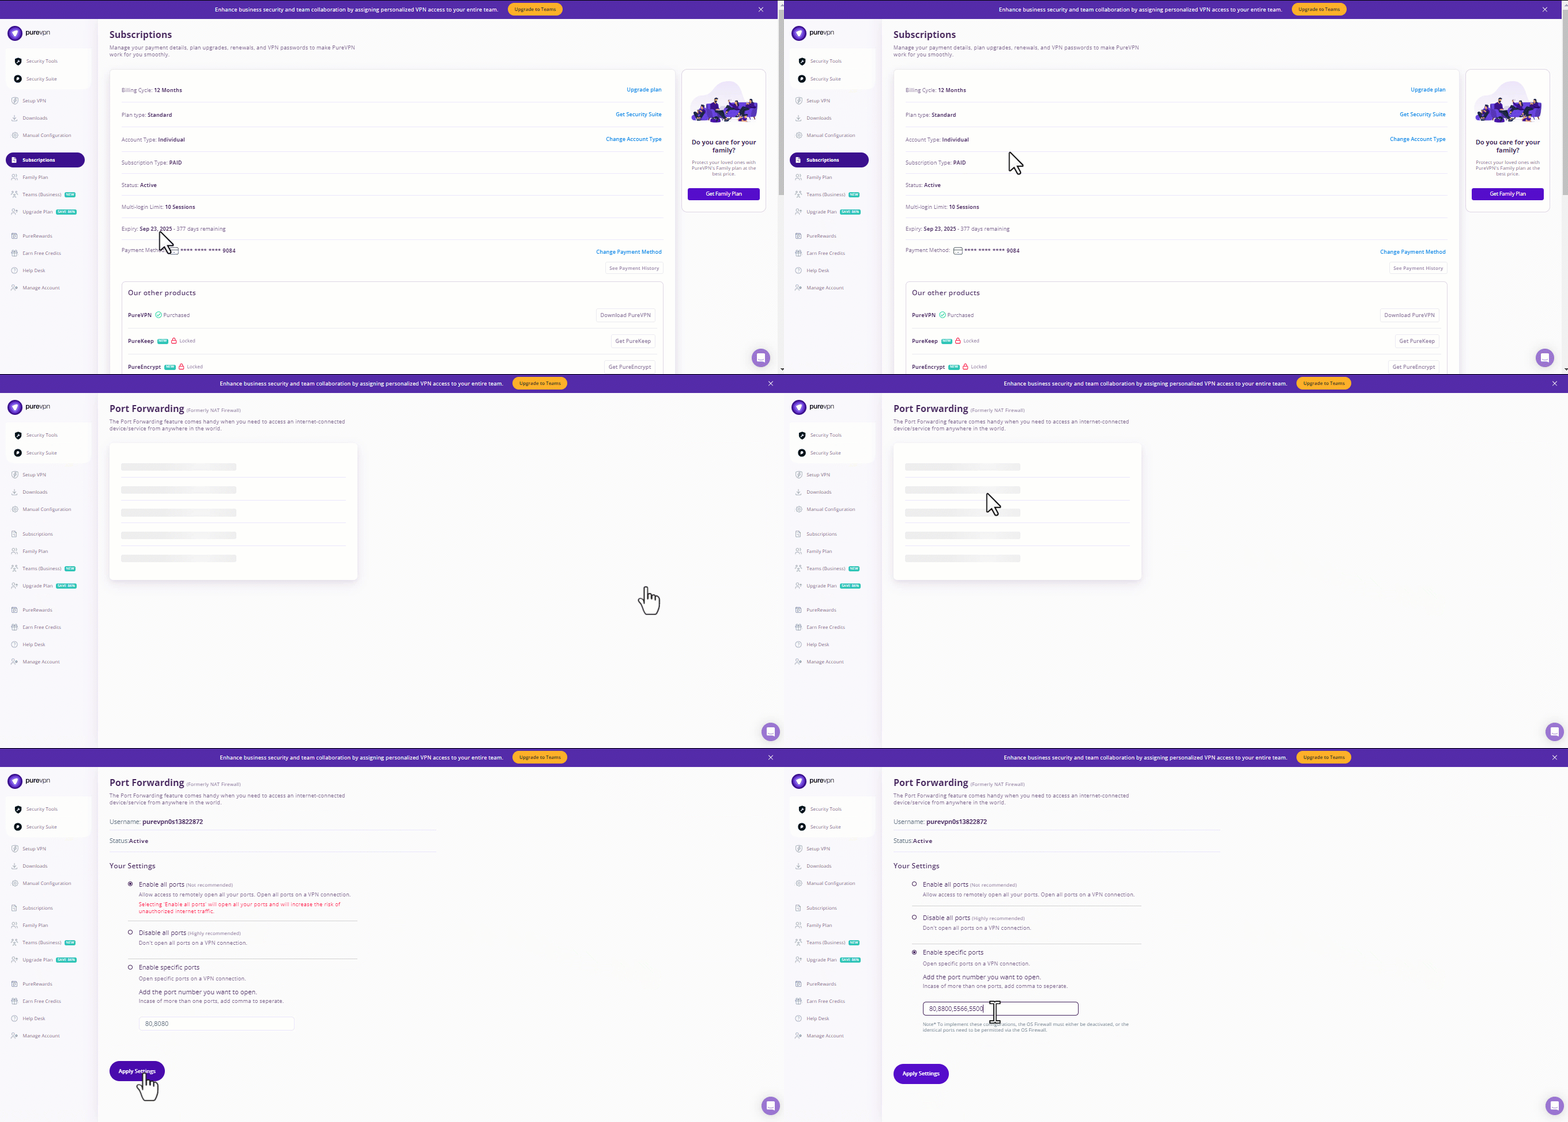
- Sign up for PureVPN, add Port Forwarding to your plan, and complete the payment.
- Download and install the PureVPN app, launch it, and log in using your credentials.
- Access the PureVPN Member Area, go to Subscriptions and click Configure next to Port Forwarding.
- Choose Enable specific ports, enter the ports you want to open, and click the Apply Settings button.
- Open the PureVPN app, connect to a port forwarding-supported server, and you are good to go!
How to Configure Port Forwarding in Genie Manually
Step 1: Determine Your Device & Port
- Identify the internal IPv4 address of your target device (e.g.
192.168.1.100). Use the Attached Devices list under the Basic tab, matching MAC addresses if needed. - Determine the ports your application uses (e.g. port 25565 for Minecraft).
Step 2: Reserve the IP Address
To prevent IP changes, reserve it via LAN Setup > Address Reservation or configure manually on the device.
Step 3: Log into Genie Interface
- Open a browser and go to
http://routerlogin.netorhttp://192.168.1.1. - Login as
admin(default password unless changed).
Step 4: Add a Custom Service
- Navigate to Advanced > Advanced Setup > Port Forwarding/Port Triggering.
- Ensure Port Forwarding radio button is selected.
- Click Add Custom Service.
- Fill in:
- Service Name: Friendly label (e.g. “Minecraft_Server”).
- Protocol: Choose TCP, UDP, or Both.
- External Starting/Ending Port: The public port.
- Internal IP Address: The reserved IP of device.
- Internal Port: Same as external unless mapping differs.
- Click Apply to save the custom service.
Step 5: Enable the Inbound Rule
Under Inbound Services, click Add, then select your newly created service and assign to the device’s IP. Click Apply to activate rule.
Configuration Table
| Field | Example Input |
|---|---|
| Service Name | Minecraft_Server |
| Protocol | TCP/UDP |
| External Port | 25565 |
| Internal Port | 25565 |
| Internal IP Address | 192.168.1.100 |
| Status | Enabled |
Once listed, Genie will show the rule in the Inbound Services list.
Testing Port Forwarding
Verify your setup using tools like [canyouseeme.org] or [portchecktool.com]:
- Make sure the service is running when you test (e.g. Minecraft server active).
- If scanning shows closed port:
- Confirm correct internal IP and port.
- Verify your device firewall isn’t blocking it.
- Ensure no ISP-level port restrictions apply.
Common Issues & Solutions
1. Port still closed?
Even with proper setup:
- Check Windows Firewall or device firewall settings.
- Confirm the server/service is actively listening.
- Ensure WAN IP address matches public IP. If not, ISP may be using CGNAT, requiring alternative solutions.
2. Typo in rule or wrong protocol?
Netgear applies rules sequentially, from top to bottom. A rule above may unintentionally capture traffic, preventing later rules from working correctly.
3. Double NAT in play?
If your ISP modem also is routing, you could face Double NAT, blocking inbound forwarding. Either bridge the ISP device or enable DMZ to your Netgear router.
How to Port Forward Using Netgear Genie Firmware?
Log in to the router’s Genie admin page (routerlogin.net), navigate to Advanced > Advanced Setup > Port Forwarding/Port Triggering, add a Custom Service defining service name, protocol (TCP/UDP), external and internal ports, and internal device IP, then enable the rule under inbound services and click Apply. Test using an external scanner while the service is running.
Security Best Practices
- Port forwarding opens specific inbound access—only expose what’s necessary.
- Avoid enabling remote management over port 80/8080.
- Use PureVPN’s password manager for setting up strong passwords, keep services updated, and limit forwarding to IPv4 devices.
- Consider using a VPN to access services securely rather than opening ports publicly.
Final Thoughts
Port forwarding with Netgear Genie is intuitive once you understand the workflow: reserve your device IP, create a custom service, enable the inbound rule, and test externally. For stubborn issues, DMZ or ISP-level NAT may be at play. By combining best practices, security measures, and troubleshooting strategies, you regain visibility, control, and reliable access to your home network from anywhere.


