Table of Contents
Sometimes, accessing specific devices or services on your Eero network is difficult. Because, just like any other router, your Eero router comes with a firewall that stops certain incoming connections. However, you can quickly resolve this problem by port forwarding.
But, if you need to learn how to port forward your Eero router, then keep reading; in this article, we’ll walk you through the step-by-step process of configuring port forwarding on your Eero router. By the end of this article, you will have the knowledge and tools to access all the devices and services you need.
So, let’s dive in and start port forwarding on your Eero router.

Why You Need It with Eero
- Home Automation & IoT Servers
Want to access your Home Assistant dashboard, or control smart devices like HomeKit or Zigbee hubs? Port forwarding lets you connect securely even when away from home. - Hosting Game or Minecraft Servers
Sharing your game world with friends? Opening the right TCP/UDP ports keeps the connection smooth and reliable. - Security Camera Feeds & Remote Access Tools
Whether it’s your Blue Iris NVR or an RDP session to your home PC, you’ll need to forward the proper ports so you’re never locked out. - Remote Desktop / Self-hosted Web Servers
Serving up files, websites, or private dashboards? Port forwarding ensures they’re reachable—and only to whom you choose.
Requirements to Port Forward Eero Router
To set up port forwarding on your Eero router, you need the following:
- Eero app installed on your device (iOS or Android)
- Login details to access the app interface (email or phone number)
- The device is connected to the Eero router and has the Eero app installed.
- The IP address of the device on which you want to forward ports.
- Port numbers (TCP and UDP)
Ports you need to open on your Eero router
The ports you need to open depend on the device or service you are trying to connect to.
For example, if you want to play online games, you may need to open ports such as 80, 443, and 1935. To use a remote desktop application, you might have to open TCP port 3389, and in the case of a file-sharing program, you will need to open TCP ports such as 139 and 445.
As you can see, different ports are required for other purposes. To identify the specific ports you need to open, always refer to the documentation for the device or service you want to access.
Step-by-Step Guide on How to Port Forward Eero Router
To set up port forwarding on your Eero router, follow these steps:
- Open the Eero app on your mobile device.
- Login by providing your “Email” or “Mobile Number.“
- Once logged in, Tap on the “Menu Button” at the top left of the screen.
- From the menu, select “Network Settings.”
- Now, scroll down and select “Advanced Settings.”
- Look for “Reservations & Port Forwarding” and tap on it.
- Tap on “Add a reservation.”
- Select the device you want to forward ports to
- Then tap on “+ Open a port.”
- Now, click “Save” in the pop-up window.
- In this section, provide the following details to set up port forwarding.
- Port Name: Any name you want (e.g., “Minecraft Server”)
- External Port: Incoming port number (TCP or UDP)
- Internal Port: It can be the same if you want to open a single port
- Protocol: TCP or UDP or Both
- After providing all the details, tap on the “Save” button in the upper-right corner.
Note: To ensure your port forwarding settings stay in place, we recommend setting up a static IP address on your device. This will prevent your device from getting a new IP address each time it restarts. You can get a static IP address for your device within minutes using our dedicated IP service.
Keep your Port Forwarding Secure with PureVPN
Do you want to improve the security of your port forwarding setup? Look no further than PureVPN’s port forwarding add-on! With this add-on, you can benefit from the optimal security without complex port forwarding setups and protect your network in seconds.
How to Open Ports Behind CGNAT on Your Eero Router
CGNAT is a common practice many ISPs perform to overcome the shortage of public IPv4 addresses. It is a mechanism that allows multiple devices to share a single public IP address, making it challenging to open ports behind CGNAT.
However, using PureVPN’s PortForwarding add-on, you can open ports on your Eero router behind CGNAT easily and securely. The add-on is designed to avoid any restrictions imposed by your ISP and CGNAT, making port forwarding simple!
Follow the steps below to start port forwarding on your Eero router today.

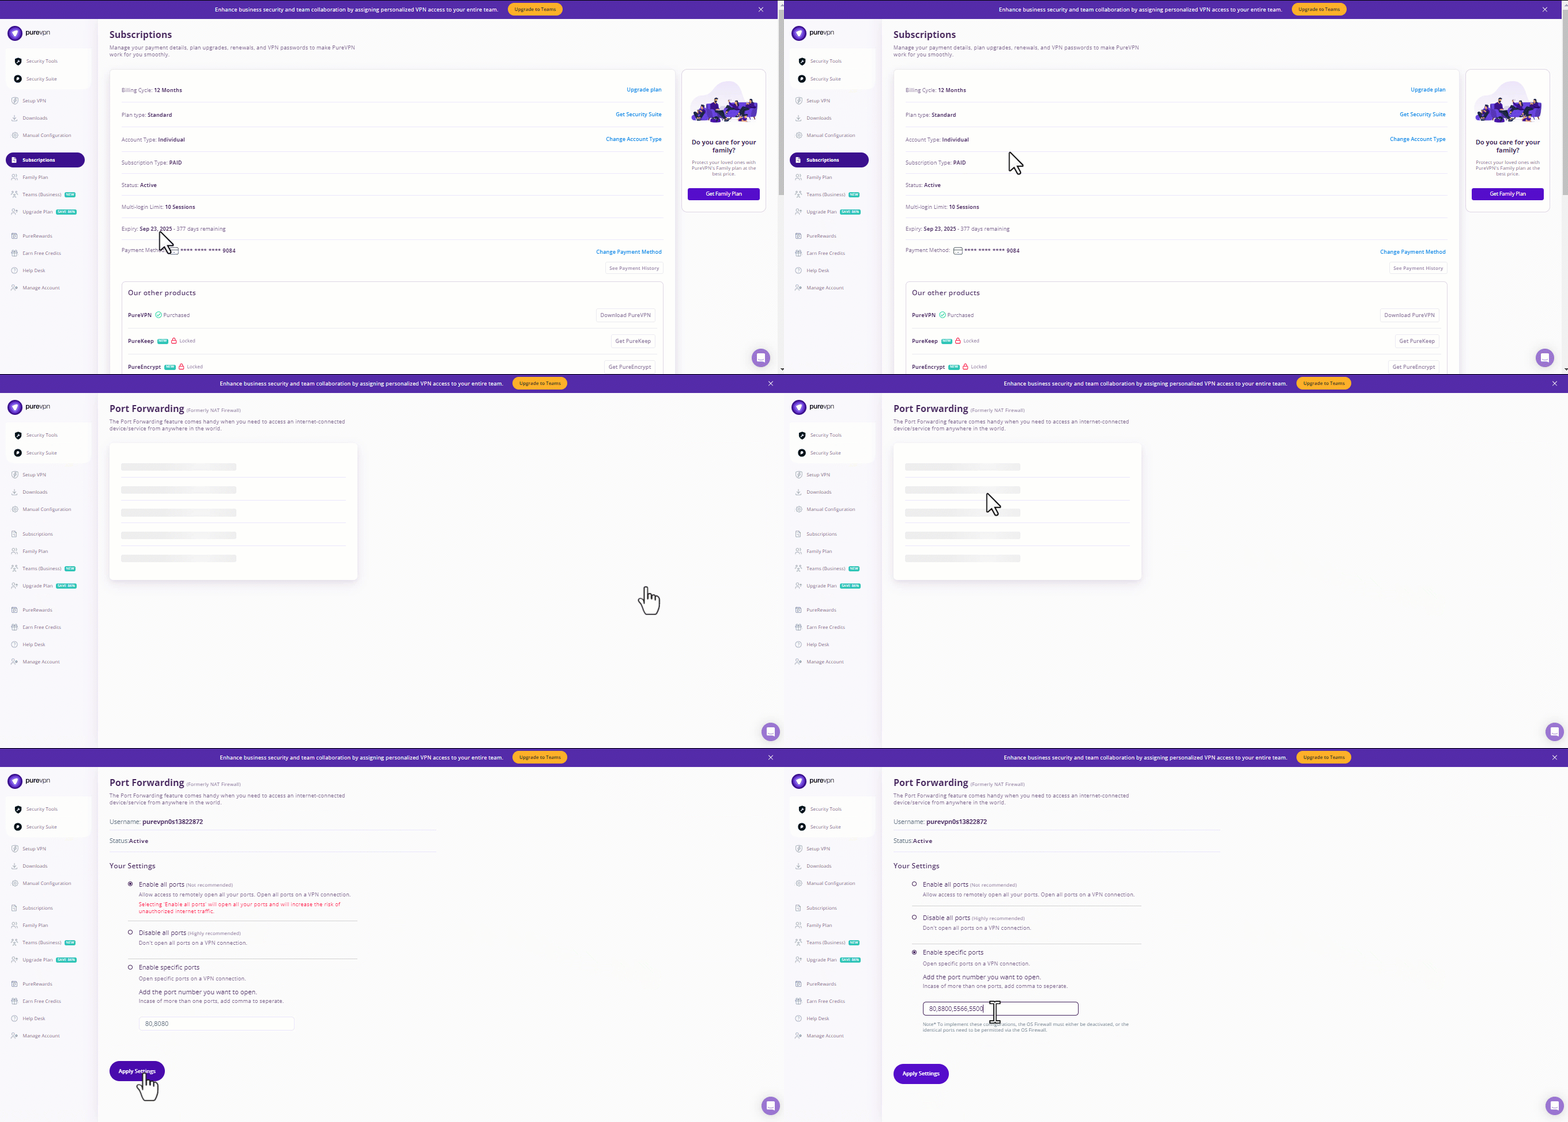
- Subscribe to PureVPN and download the app on your device.
- Log in to your PureVPN account.
- Navigate to the “Subscription” section.
- Click on “Configure” and then select “Enable Specific Ports.”
- Customize your port settings by entering the appropriate port numbers.
- Finally, save your changes by clicking “Apply Settings.”
PureVPN’s Port Forwarding Add-on
The perfect solution to open your ports quickly, easily, and safely!
Are you tired of struggling with complicated and potentially unsafe port forwarding configurations on your Eero router? Check out the port forwarding add-on by PureVPN; it offers a simple and secure solution.
With this add-on, you can ensure that your ports remain open and easily accessible while keeping your online activity secure and private. Also, you can open and close any port with a click of a button.
In short, the port forwarding add-on is a stress-free way to configure port forwarding while keeping the process simple and efficient.
Troubleshooting Common eero Port Forwarding Issues
Problem 1: Port Forwarding Isn’t Working
- Firewall Blocking? Some devices (like Windows PCs) have their own firewalls. Ensure the port is allowed in Windows Defender Firewall or Mac Security Settings.
- Double NAT? If you have a modem-router combo, enable bridge mode on the modem or forward ports on both devices.
- ISP Restrictions? Some ISPs (like AT&T Fiber) block common ports. Try a non-standard port (e.g.,
32500instead of32400for Plex).
Problem 2: Port Shows Open but Service Isn’t Accessible
- Application Misconfiguration: Ensure the service (e.g., Plex, game server) is running and bound to the correct IP.
- Dynamic DNS Needed? If your public IP changes often, use a DDNS service to maintain a consistent domain.
Problem 3: eero App Says “Port Forward Added” but No Effect
- Restart eero: Sometimes, rules need a refresh.
- Check for IP Conflicts: Ensure no other device is using the same IP.
Advanced Tips: Security & Optimization
1. Use a VPN Instead (For Remote Access)
Port forwarding exposes devices to the internet. For safer remote access:
- Set up Port Forwarding Add-on + VPN (PureVPN preferred).
2. Enable UPnP (For Simplicity but Less Security)
If you’re tired of manual forwarding, Universal Plug and Play (UPnP) lets apps open ports automatically.
- Enable in eero Labs → UPnP.
- Warning: UPnP can be exploited by malware—use cautiously.
3. Schedule Port Forwarding (For Temporary Needs)
Since eero doesn’t natively support scheduling:
- Manually remove rules when not in use.
- Use a smart plug to power-cycle the device when done.
Frequently Asked Questions
Yes, you can port forward on an Eero router. However, check out the Port Forwarding add-on if you find it difficult. It makes port forwarding easy!
To set up port forwarding on your Eero router, open the Eero app, go to Network settings, select Reservations & Port Forwarding, and tap “Add a reservation.” Now provide all the details (Name, Port Numbers, Protocol) and click “Save.”
You can open ports with Eero using the Eero mobile app (iOS and Android).
Eero port forwarding opens certain ports for a specific device or application on your network.
The port used for Eero depends on the type of application or service you want to use. So, to determine the port number, always check the documentation of the service or application.
Conclusion
Port forwarding on eero isn’t just for gamers, it’s a cornerstone for power users, home server hosts, and DIY smart home architects. By reserving IPs, opening specific ports, and understanding potential obstacles like CGNAT or firewall conflicts, you unlock capabilities far beyond the basics. Whether you’re streaming movies from Plex, gaming with friends, or remote-controlling your smart home, it’s time to take control of your network.


