Table of Contents
Kubernetes has revolutionized the way organizations build, deploy, and manage applications. However, with the applications becoming increasingly complex, the underlying networking and routing requirements are also getting complicated. One of the organizations’ most common challenges is forwarding traffic from outside a Kubernetes cluster to services running inside it. And this is where port forwarding Kubernetes routers come in.

Kubernetes routers manage traffic flow between various components within a Kubernetes cluster. These routers are essential for enabling communication between pods, nodes, and services within the cluster. They also play a crucial role in ensuring that applications are highly available and can scale horizontally as demand increases.
Port forwarding Kubernetes routers directs external traffic to a specific service or pod within a Kubernetes cluster. You can use this process for various cases, including exposing web applications, accessing databases, and enabling secure communication with external services.
In this article, we will explore the process of port forwarding Kubernetes routers, including all the requirements, steps, and port information. You will also find an easier way to forward ports on your routers with or without Carrier Grade Network Address Translation [CGNAT].
What is Kubernetes Port Forwarding?
Port forwarding in Kubernetes allows you to forward network traffic from your local machine to a specific pod or service inside the cluster. This is particularly useful when you need to:
- Debug an application running in a pod.
- Access a database or internal service temporarily.
- Test changes locally before deploying them.
- Troubleshoot connectivity issues without exposing services externally.
Unlike NodePort, LoadBalancer, or Ingress, port forwarding doesn’t require modifying Kubernetes service configurations. Instead, it creates a direct tunnel between your local machine and the cluster.
Why We Need Port Forwarding in K8s
Before we dive into the “how,” let’s understand the “why.” Kubernetes networking is designed for isolation and scalability. Pods get their own IP addresses, services provide stable endpoints for load balancing, and ingress controllers manage external access. This is fantastic for production, but it creates a challenge for local development and troubleshooting:
- Pod IPs are ephemeral: Pods can be rescheduled, crash, and restart, leading to new IP addresses. You can’t reliably connect directly to a pod’s IP.
- Services provide internal access: A
ClusterIPservice, the most common type, is only accessible from within the cluster. Your laptop isn’t part of that internal network. - External exposure is complex and often unnecessary: Setting up a
NodePort,LoadBalancer, orIngressresource just to test a small change or debug an issue is overkill, time-consuming, and potentially insecure.
kubectl port-forward elegantly bypasses these complexities. It creates a direct, secure, and temporary connection, allowing you to treat a remote pod or service as if it were running on localhost.
How Does Kubernetes Port Forwarding Work
When you execute a kubectl port-forward command, here’s a simplified breakdown of what happens:
- Client-Side Request: Your
kubectlclient on your local machine sends a request to the Kubernetes API server in your cluster. This request specifies which local port you want to use and which remote pod, deployment, or service, along with its internal port, you want to connect to. - API Server as Proxy: The Kubernetes API server acts as a secure intermediary. It establishes a WebSocket connection with your local
kubectlclient. - Kubelet Connection: The API server then instructs the
kubelet(the agent running on the node where your target pod resides) to establish a connection to the specified port within that pod’s container. - Data Tunnel: A secure, bidirectional tunnel is created. Any traffic sent to your specified local port is forwarded through this tunnel to the target port on the pod, and responses are sent back the same way.
Crucially, this entire communication is encrypted via TLS (Transport Layer Security), leveraging your existing kubectl authentication. This means your data is secure in transit, even though you’re bypassing standard network routing. The connection remains active as long as the kubectl port-forward command is running in your terminal. Once you terminate the command (usually with Ctrl+C), the tunnel is closed.
Things you’ll need
- A Kubernetes cluster
- A Kubernetes router
- A service to forward traffic to
- A port to forward traffic to
The Step-by-Step Process for Kubernetes Port Forwarding
The following are all the steps you may need to follow to configure port forwarding on a Kubernetes router:
- Select a Kubernetes router that suits your requirements.
- Identify the service or pod you want to forward traffic to within the Kubernetes cluster.
- Determine the port that the service or pod is listening on.
- Select a port on the router to forward traffic from outside the cluster.
- Create a Kubernetes service for the service or pod that you want to forward traffic to [this will act as a target for the traffic forwarded by your router].
- Configure the router [depending on your chosen router, the configuration steps may vary].
- Configure firewall rules and other security settings to secure the port forwarding.
These are the general steps you’ll need to follow to set up port forwarding for Kubernetes. The exact steps will vary based on the router you choose and the specifics of your Kubernetes environment.
TCP/UDP port information
The following are some of the common TCP and UDP ports used by Kubernetes:
- TCP/UDP port 53: DNS resolution
- TCP/UDP port 2379: used by etcd database
- TCP/UDP port 6443: Kubernetes API server communication over HTTPS
- TCP/UDP port 10250: communication between kubelet and the Kubernetes API server
- TCP port 9090: Prometheus monitoring system
- TCP port 30000-32767: NodePort services
- TCP/UDP port 8472: VXLAN traffic between Kubernetes nodes
- TCP/UDP port 4789: VXLAN traffic between Kubernetes nodes
- TCP/UDP port 7946: overlay network traffic in Kubernetes
- TCP/UDP port 10253: read-only Kubelet API
PureVPN’s port forwarding add-on eliminates all the tricky steps
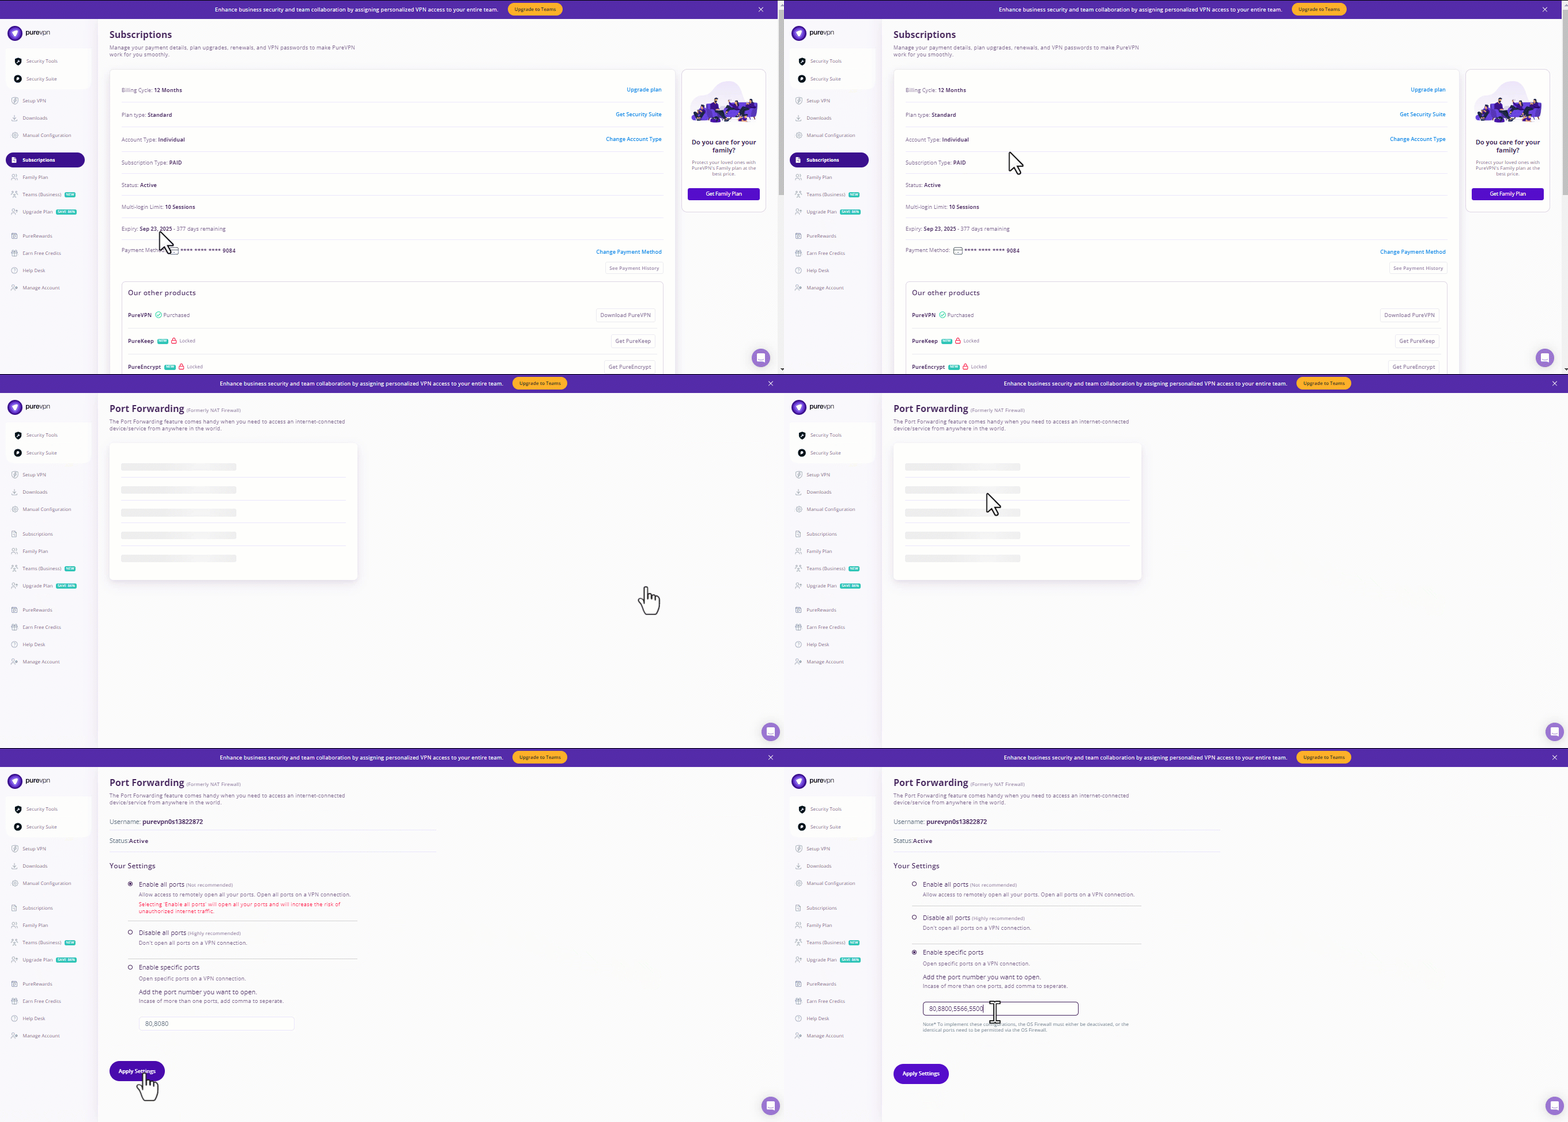
Setting up port forwarding can be tough. Luckily, with PureVPN’s port forwarding add-on, you can cut down all the steps in half and turn the task significantly easier. Here’s how it works:
- Head to PureVPN’s member area after logging in
- Navigate to the Subscription tab on the left-hand panel
- Choose your required port settings
- Select Apply Settings to save your settings

Is CGNAT making port forwarding even trickier?
When connecting to the internet from your home network, your internet service provider [ISP] typically assigns you a single public IP address. However, you may need more than one IP address to use the internet simultaneously on multiple devices. This is where CGNAT comes in.
ISPs use CGNAT to share a single public IP address among multiple customers. This means several customers can share the same public IP address, helping ISPs conserve public IP addresses and extend their available IPv4 address space.
However, CGNAT can make port forwarding even trickier since your ISP’s router has to keep track of which customer’s device is associated with which port. Since numerous customers share a public IP address, the router must use Network Address Translation [NAT] to translate the IP addresses and ports.
NAT can lead to unexpected behavior and connectivity issues, requiring several more complicated port forwarding steps. Don’t want to get into the complications of setting up port forwarding with CGNAT? Click on the link below to find an easier method.
Different Ways to Forward Ports in Kubernetes
1. Forwarding to a Pod
The simplest method—directly forward a local port to a pod.
kubectl port-forward pod/mysql-5f6b8d7c4d-abc12 3306:3306
Now, MySQL is accessible at localhost:3306.
2. Forwarding to a Service
If you don’t know the exact pod, forward via a service:
kubectl port-forward svc/my-service 8080:80
This automatically selects a pod behind the service.
3. Forwarding Multiple Ports
Need multiple ports? Specify them in one command:
kubectl port-forward pod/nginx 8080:80 8443:443
Now, http://localhost:8080 and https://localhost:8443 work simultaneously.
4. Background Port Forwarding
To keep the tunnel running in the background:
kubectl port-forward pod/redis 6379:6379 &
Use fg to bring it back or kill %1 to stop it.
Set up port forwarding like it’s child’s play
No matter which router you’ve picked for Kubernetes or whether or not your ISP performs CGNAT, you can set up port forwarding for anything and from anywhere using PureVPN’s port forwarding add-on. Thanks to the add-on, you can easily forward, access, block, and allow all required ports in a few minutes – if not seconds.
The add-on enables you to access your router’s settings and set up or pause port forwarding rules from anywhere and on any network. Learn more about this handy add-on by clicking on the link below.
Conclusion
Setting up port forwarding, as complicated as it is on any router, is extremely tricky when you’re in the Kubernetes environment. Don’t waste your time learning this highly technical process when you can get the job done within seconds using PureVPN’s port forwarding add-on. Try the add-on and start forwarding ports on your router like a pro.
Frequently Asked Questions
You may need to configure port forwarding on a Kubernetes router to expose a service or pod within the cluster to external networks.
You can create a Kubernetes service using a YAML file that defines the service’s name, labels, ports, and other configuration details.
The steps to configure port forwarding on a Kubernetes router will differ based on your chosen router. Generally, you must create a rule that maps a port on the router to a port on the service or pod.
To test port forwarding on a Kubernetes router, you can access the service or pod using the external IP address of the Kubernetes cluster and the port on the router that you specified.
You can secure port forwarding on a Kubernetes router by configuring your firewall rules and other security settings. Doing so will ensure that only authorized traffic can access the forwarded port.


