The TP-Link Archer C9 router features a basic firewall to protect your network, but it also blocks incoming connections that you need for certain apps or services. To solve this, you will need to set up port forwarding on your TP-Link Archer C9.
Not sure how to start? Whether you need to access your desktop remotely or set up a multiplayer game server, our TP-Link Archer C9 port forwarding guide will help you open the necessary ports securely and smoothly.

What Information is Needed for TP-Link Archer C9 Port Forwarding?
To set up port forwarding for TP-Link Archer C9, you will need the following details:
- IP Address: Find the local IP address of the device that will receive the traffic, like your PC or gaming console.
- Port Number and Protocol: Figure out the specific port number your app or service runs on, and whether it uses TCP, UDP, or both.
- External Port: Decide if you will mirror the internal port number for outside access or choose a different one for incoming connections from the internet.
- Router Credentials: Have your router’s login information ready, as you will need to access the settings menu to make these changes.
How to Enable Port Forwarding on TP-Link Archer C9
Here is how you can set up port forwarding on your TP-Link Archer C9 router:
Step #1: Set Up a Static IP
To make sure your ports stay open after a reboot, set up a static IP address on the device you are forwarding to. This can be done by:
- Assigning a permanent IP via DHCP reservation.
- Setting up a static IP address manually.
Related Read: How to Set Up a Static IP Address
Step #2: Log into Your Router
To make settings changes, log into the TP-Link Archer C9 router:
- Open any web browser like Chrome, Firefox, or Edge.
- Type in your router’s IP address and press Enter.
- Enter the username and password for the TP-Link Archer C9 router to log in.
Step #3: Open Port Forwarding Settings
Once logged in, you need to find the port forwarding section:
- Go to the Network Map page of your router.
- Click on the tab labeled Advanced.
- Select Forwarding from the left sidebar menu.
- Click Virtual Servers, and then choose Add New.
- Enter the required port in both the Service Port and Internal Port fields.
- Type the IP address you are forwarding these ports to in the IP Address box.
- From the Protocol dropdown, choose the protocol for the ports you want to forward (TCP, UDP, or Both).
- Set the status to Enabled using the dropdown box.
- Click Save to apply the settings.
Step #4: Test if the Ports are Open
After configuring port forwarding, perform the following checks:
- Use an online port checker tool to verify if the forwarded ports are open.
- Try accessing the service from outside your network to confirm if port forwarding is successful.
TP-Link Archer C9 Port Forwarding Made Easy!
Easily set up port forwarding on your TP-Link Archer C9 with PureVPN’s Port Forwarding add-on—it simplifies the whole process and eliminates the hassle of manual configurations. Just a few clicks, and you are ready to open or close ports without effort!
How to Port Forward TP-Link Archer C9 with PureVPN

Here is how you can use PureVPN to port forward your TP-Link Archer C9 router in no time:
- Sign up for PureVPN, add Port Forwarding to your plan, and complete the payment.
- Download and install the PureVPN app, launch it, and log in using your credentials.
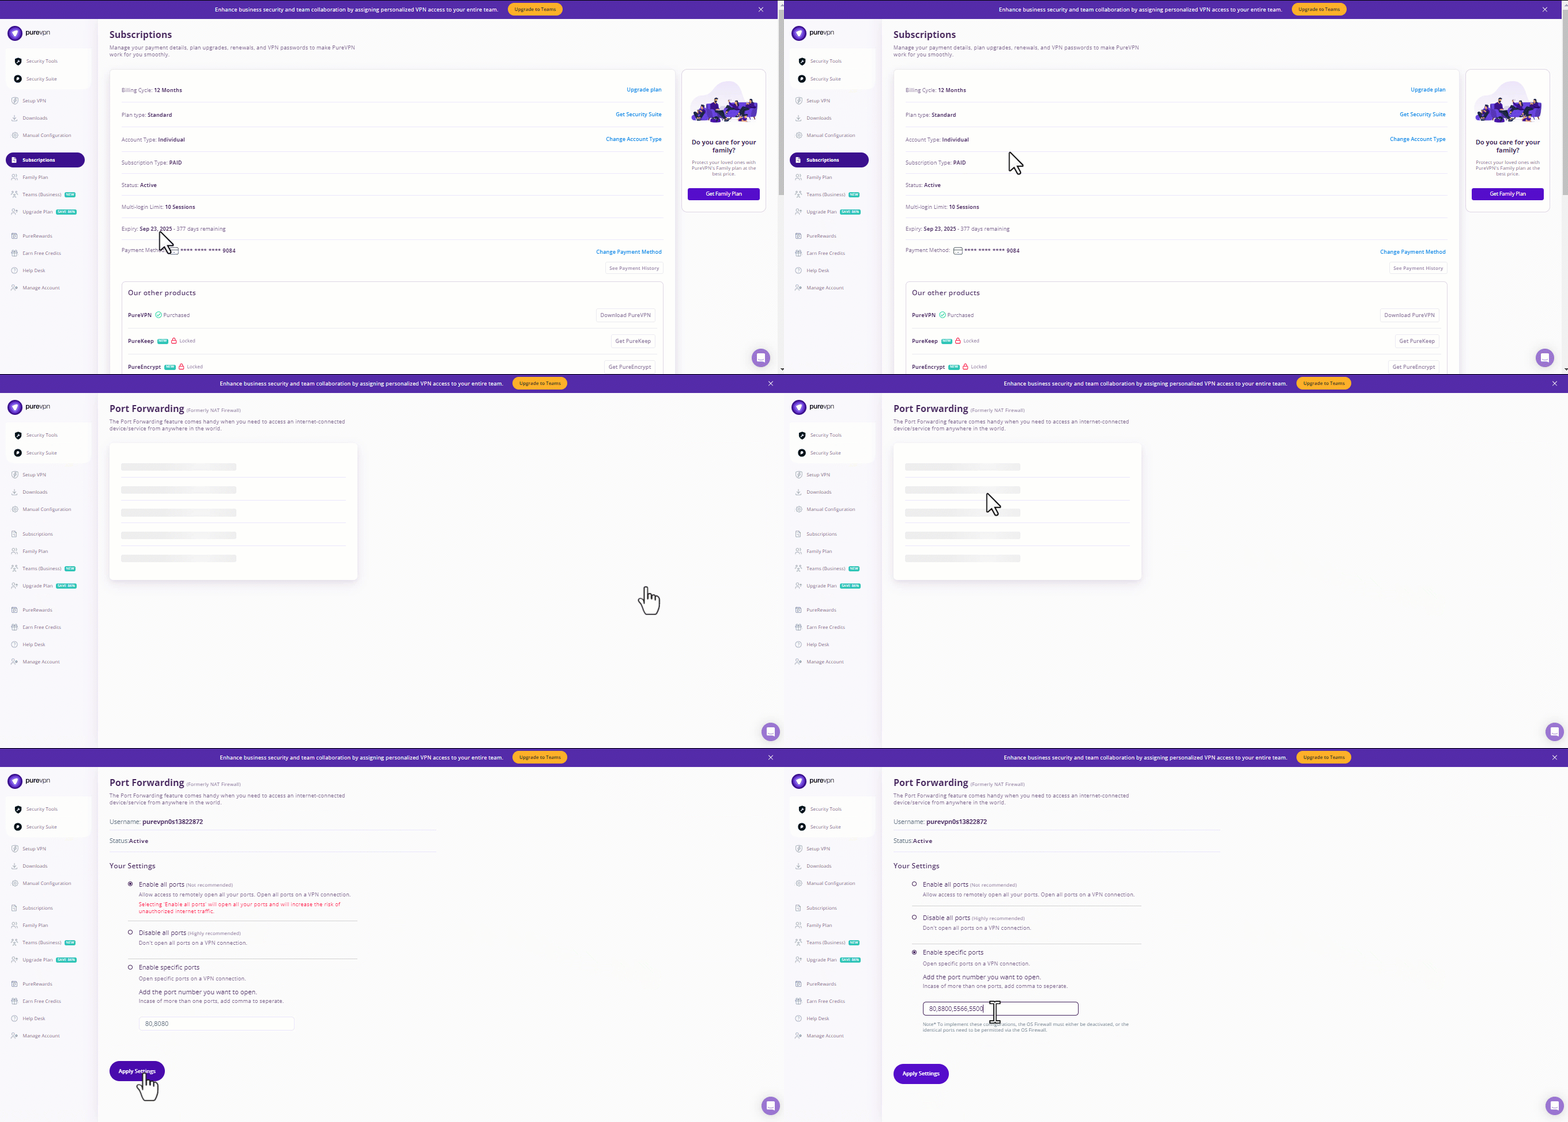
- Access the PureVPN Member Area, go to Subscriptions and click Configure next to Port Forwarding.
- Choose Enable specific ports, enter the ports you want to open, and click the Apply Settings button.
- Open the PureVPN app, connect to a port forwarding-supported server, and you are good to go!
Why is TP-Link Archer C9 Port Forwarding Not Working?
If port forwarding is not working on your TP-Link Archer C9, it could be due to the following reasons:
- Incorrect IP Address: Check the IP address entered for the device in the port forwarding settings matches the device’s current IP. If the IP changes, the ports will not forward correctly.
- Firewall Interference: Sometimes, your computer’s firewall can block port forwarding. Temporarily disable the firewall to test if this is the cause, and adjust settings accordingly.
- Wrong Port Numbers: Make sure you have not entered the wrong port numbers in the port forwarding settings. Mistyping a port number or using the wrong port for a service can prevent it from working.
- Router Firmware Issues: Outdated or buggy firmware can cause port forwarding to malfunction. Check for updates on your TP-Link router’s admin page and install any available firmware updates.
Frequently Asked Questions
The default IP address of TP-Link Archer C9 is 192.168.0.1, which can be used to log into your router’s admin interface.
Yes, the TP-Link Archer C9 supports port forwarding. To access it, go to Network Map > Advanced > Forwarding > Add New.


