Table of Contents
Have you thought about your DNS Server lately? If not, there’s a possibility that your ISP or anyone familiar with all your DNS queries could potentially monitor your internet connection. This implies they know every website you visit.
According to a 2021 study by the Neustar International Security Council, 72% of enterprises had experienced at least one DNS attack in the previous year, with 58% of those incidents having a significant impact.
The only solution to this problem is configuring using encrypted DNS traffic.

What is Encrypted DNS Traffic?
The function of Encrypted DNS traffic is to encrypt the plain text DNS information, which is only available to the parties engaged in the communication. Primarily the DNS client, which includes your browsers and other network devices.
This secure connection guarantees you reach the website you are meant to visit.
With encrypted DNS, your DNS requests are protected from potential cyber threats and the prying eyes of third parties trying to observe your online activities. Let’s examine the types of DNS encryption.
Types of DNS Encryption
DNS encryption has become crucial due to the rise of online businesses and increasing cybercrime, which the original DNS protocol didn’t anticipate in its early years.
DNS over TLS (DoT) and DNS over HTTPS (DoH) were developed to address this need.
DNS over TLS (DoT)
DNS over TLS is a security protocol using the Transport Layer Security (TLS) protocol to encrypt DNS queries and responses.
This builds on the user datagram protocol (UDP) with TLS encryption, aiming to enhance privacy and security by preventing man-in-the-middle attacks on DNS traffic.
Port 853 is commonly used for DoT. Advocates suggest that DoT is better suited for addressing human rights concerns in challenging jurisdictions, although its impact in restricting speech in authoritarian regimes remains uncertain.
DNS over HTTPS (DoH)
DNS over HTTPS employs HTTPS for remote DNS resolution and uses port 443, the industry standard for HTTPS connections. This protocol requires resolvers (DoH clients) to connect to a DoH server with a query endpoint.
Major web browsers, including Google Chrome, Microsoft Edge, Mozilla Firefox, and Opera, support DoH and allow users to configure it in their settings.
Google Chrome, version 83 and later, supports DoH for Windows and macOS, while Microsoft Edge and Mozilla Firefox have also integrated DoH support. Opera also enables or disables DoH in its preferences.
DNS Over HTTPS in Operating Systems
Windows 10 and Apple have started embracing DNS over HTTPS in their settings. Windows 10 allows users to enable DoH in the Settings menu, particularly in versions 1805 and later.
With recent updates, Apple now enables app developers to use their encrypted DNS configurations in their apps, reducing the need for manual controls.
How Does Encrypted DNS Traffic work?
Encrypted DNS traffic uses encryption protocols to secure DNS requests. When DNS traffic lacks encryption, it risks exposing this data to unauthorized eyes through an unsecured connection.
However, if you configure encryption protocols on your network, the resolver, who is the intended recipient, is the only person who will be able to understand your data.
If your internet service provider (ISP) or a malicious actor tries to observe or intercept DNS queries, they will only see encrypted, unreadable characters.
For secure DNS transfer to function effectively, it’s crucial that the resolver is aware of the encryption protocols applied to your network.
How To Set Up Encrypted DNS
In the following section, we will explain how to set up encrypted DNS on your Android, iOS, and Desktop devices.
Desktop
To Set up Encrypted DNS on your desktop, you will need software for encryption.
Do your research and find out which DNS Client works best for you. In this demonstration, we have discussed YogaDNS.
- Go to YogaDNS.com.
- Click on Download.
- Complete the setup process and install the software.
- Once installed, launch the Client.
- Make sure that it is on empty configurations.
- Click Next.
- Next, in the top left corner, click DNS Servers.
- Click on Add.
- Type a name.
- Select the DNS Type.
- Mention your IP address (CloudFlare). 1.0.01.
- Next, mention the hostname, Cloudflare-dns.com.
- Hit Check to see if it’s working.
- Now Click OK.
- Click OK again.
- You will get a message asking if you want to create a new rule. Hit Yes. This will route all the DNS traffic through your configured DNS server.
- And that’s it. You have set up encrypted DNS on your desktop.
Android
Follow these steps to manage Private DNS options on your Android device:
- In settings, tap on “Network & Internet.”
- The name might differ depending on your device; for instance, it could be “Connections.”
- Then, look for the “Private DNS” option.
- Clicking on it will open a dialogue box with the feature.
- If you do not see “Private DNS” immediately, try clicking either “More Connection Settings” or “Advanced.”
- You will see three options: Off, Automatic and Private DNS provider hostname.
- To turn off DNS over TLS, select Off.
- Choose Automatic if you want encrypted DNS whenever available.
- If you have a specific private DNS provider in mind, you can just enter the hostname provided by that source and enable encrypted DNS on Android.
- Remember to use a hostname instead of DNS server IPs.
- After selecting, tap “Save” to apply the changes.
iOS
Here are the steps to set up a private DNS on an iOS device:
- Open the settings application on your iOS device
- Click on “WiFi” to go to WiFi settings.
- Find out which WiFi network you’re connected to.
- Then, tap the “i” icon beside it for more options.
- Search for “Configure DNS” under DNS and tap it.
- Change to manual mode to enter manual DNS settings.
- Choose a new DNS server by clicking on the plus sign.
- You may prefer any of these addresses: Cloudflare (1.1.1.1), OpenNIC (192.95.54.3), or Quad9 (9.9.9.9).
- Press “Save” at last to save changes made.
Note that these custom DNS server settings only apply to the current WiFi network. If you wish to apply this custom DNS server on all WiFi networks, you must go through these steps again for each network to ensure your private DNS server is up and running.
IMPORTANT: Apple introduced built-in encrypted DNS traffic handling in iOS 14. Since then, users have received Network Blocked Encrypted DNS Traffic Notifications.
This message means that the network where you are trying to connect with your Apple device is not following its security settings. Your device returns to unencrypted DNS traffic because it does not support the latest security standards.
This serious warning needs to be addressed for your online safety. The following section will discuss how one can overcome this problem.
What is Network Blocking Encrypted DNS Traffic and How To Fix It?
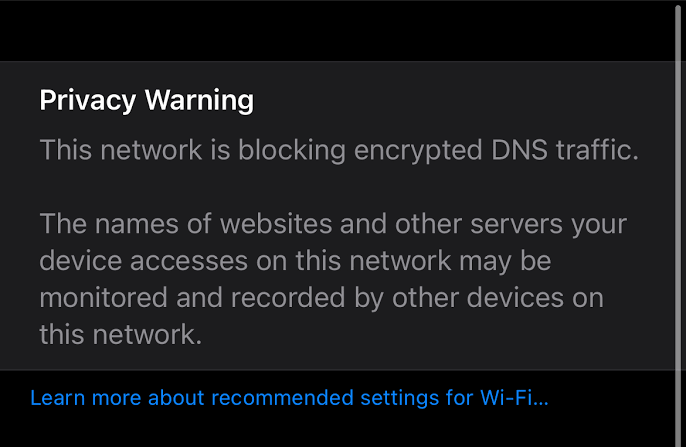
The message “This network is blocking encrypted DNS traffic” indicates that the network doesn’t meet Apple’s security standards, leading to unencrypted DNS traffic.
This can occur when connecting to a new WiFi network or reconnecting to an existing one. It allows ISPs to check your network traffic and gather information about your online habits. Since iOS 14, Apple has encrypted DNS traffic.
The following section will explain how you can solve this issue and restore your encrypted connection.
1. Restart Your iOS Device and Router:
To address potential issues with encrypted DNS traffic being blocked, start by restarting your iOS device. When you restart your phone or tablet, all the processes and applications on your device initiate anew. Additionally, consider restarting your router by turning it off, waiting for at least 15-20 seconds, and then turning it back on. Once the router has restarted, reconnect your device.
2. Forget and Reconnect to the WiFi Network:
If the issue persists, it may be related to your WiFi network. Instead of merely reconnecting, try forgetting the network first to reset network credentials. Follow these steps on your iPhone:
- Go to “Settings”.
- Tap on “WiFi.”
- Tap on your network or the info button on the right.
- Choose “Forget this network” to disconnect.
- Confirm by clicking on “Forget.”
To reconnect to the network:
- Once again, go to “Settings”.
- Tap on “WiFi”.
- Select the network.
- Enter the username and password.
- Then press “Join.”
- Update your phone and router software:
3. Update Your Router and iPhone
Keep your devices’ software up to date to ensure your encrypted DNS traffic isn’t affected by software bugs.
Update your router firmware through its settings and your iOS device by:
- Going to “Settings.”
- Tapping on “General” and then “Software update.”
- Tap on “Download and install” and follow the instructions.
4. Reset Network Settings
Clear potential bugs by resetting your network settings. Follow these steps:
- Go to Settings.
- Tap on General.
- Then tap on “Transfer or reset iPhone.”
- Tap on “Reset”.
- Next, choose “Reset network settings.”
- Enter your device password and confirm.
5. Configure DNS settings
If privacy warnings persist, configure DNS settings by:
- Go to “Settings” and tap on “WiFi.”
- Tapping on your network.
- Selecting “Configure DNS,” changing to “Manual,” and adding a DNS server’s IP address.
- Tap “Save.”
6. Use the WPA3 security protocol
Ensure your router’s security protocols align with Apple’s standards. Check and, if necessary, change your router’s security protocol to WPA3:
- Find your router’s IP address through “Settings” on your iPhone.
- Go to Settings.
- Tap on WiFi.
- Hit the i icon next to your wifi connection.
- Scroll down to the IPv4 address and note it.
- Next, log into your router’s admin panel using a web browser.
- Navigate to “Security” or “Wireless”
- Change the protocol to “WPA3.”
- Your router will restart, and you can reconnect to the network using the password.
7. Use a VPN
In situations where network restrictions or censorship attempts to block encrypted DNS traffic PureVPN proves beneficial because it can help circumvent these limitations.
When you use PureVPN, your internet traffic, including DNS requests, is encrypted and routed through the VPN server before reaching the destination.
This helps bypass any network-level blocks imposed on encrypted DNS traffic by disguising it as regular VPN traffic.
Moreover, with the help of PureVPN, you can mask your IP address and keep the malicious actors at arm’s length.
Encrypted DNS Traffic – Need Of An Hour
The online world is not safe, and we should do everything we can to stay protected on the internet. One way is through Encrypted DNS Traffic. But sometimes, we want to move past it, and that’s where our mentioned strategies will help. It is also important to always start with base-level security to secure yourself online.
PureVPN will help you with DNS leaks, and along with that, it can help you fix network-blocking encrypted DNS traffic. Stay Wary – Stay Secure.
PureVPN
July 1, 2025
1 year ago

![Is DuckDuckGo Safe? A Comprehensive Privacy Guide [Updated 2026]](https://www.purevpn.com/wp-content/uploads/2025/04/is-Duckduckgo-Safe-420x210.png)