If you have Comcast Xfinity and wish to access your home network remotely or set up a server for gaming or other activities, you might have to use port forwarding to do so.
Port forwarding allows incoming internet traffic to reach certain devices on your local network, which enables you to access services such as remote desktops, file sharing, and online gaming.
In this article, you will learn how to configure port forwarding for Xfinity using the Xfinity xFi web interface.
How to port forward for Xfinity
Follow these easy steps to port forward xFi.
- Step 1: Log in to your Xfinity xFi account
The first step in configuring port forwarding for Xfinity is to sign in to your xFi account.
Visit https://www.xfinity.com/ and select “Sign In” in the top-right corner of the page. Type your Xfinity username and password and select “Sign In” to access your xFi dashboard.
- Step 2: Access the xFi advanced settings
After logging into your xFi account, go to “More” at the bottom of the screen and select “Advanced Settings.” This will navigate you to the settings page of xFi Gateway.
- Step 3: Enable port forwarding
Select “Port Forwarding” from the left-hand menu on the xFi Gateway settings page.
If you have not activated port forwarding already, a notification will appear saying “Port forwarding is not enabled.” For enabling port forwarding for your Xfinity gateway, click the “Enable” button.
- Step 4: Set up Port Forwarding Rules
You may now set up rules to allow incoming traffic to reach certain devices on your network after port forwarding is enabled. Click the “Add Port Forward” button to add a new port forwarding rule.
- Name: The rule’s descriptive name, such as “Remote Desktop” or “FTP Server.”
- Device: The device on your network to which you’re forwarding the traffic.
- Protocol: The protocol you’re using for the incoming traffic (TCP or UDP).
- Start Port, End Port: The range of port numbers that you’re forwarding.
- You may also activate “Triggering” if your device needs it. Triggering lets the device transmit outgoing traffic for opening a port range automatically as required.
- Lastly, save your port forwarding rule by clicking the “Save” button.
- Step 5: Test your port forwarding setup
When you’ve built your port forwarding rules, you can test them to ensure they are operating properly. You may use an online port checker tool or port scanning software for checking your port forwarding configuration.
These tools help by scanning your network to see if your port forwarding policies are allowing traffic to reach the desired device.
How to Set Up Xfinity Port Forwarding With the Admin Tool (Xfinity Gateway)
1. Visit http://10.0.0.1 using a device connected to your network.
2. Log in to the Admin Tool with the given details:
- Username: admin
- Password: password
(Note: You will be asked to change your password the first time you access it. Please update the password and, if needed, log in again with the new one.)
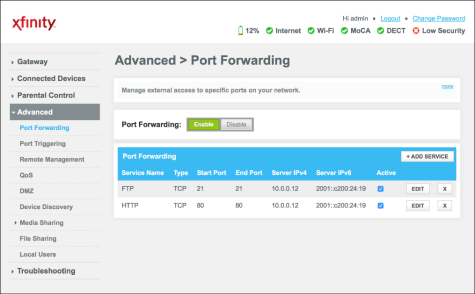
3. Head to the Advanced menu on the left and select Port Forwarding.
4. Activate it by clicking the toggle (Enable) and turning it green.
5. press +ADD SERVICE to open the Add Service page within the Port Forwarding box.
6. Select the suitable option (FTP, AIM, HTTP, PPTP) from the Common Service menu.
7. choose Other and input the Service Name if the service is not listed.
8. The start and end ports will fill in automatically or, if not, enter the required port numbers for the game or service.
9. Opt for the Service Type, usually TCP/UDP by default.
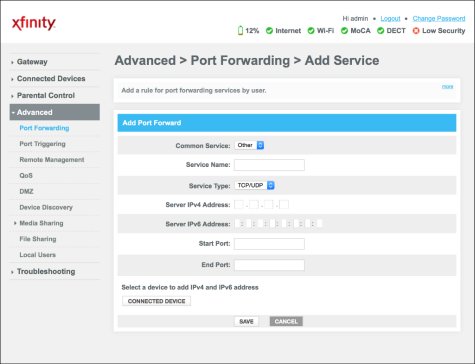
10. Click Connected Device to select the device on your network and complete the IPv4 Address or IPv6 Address fields.
11. If the Connected Device button is not visible, follow the provided steps to find the IP address.
Launch a new browser window.
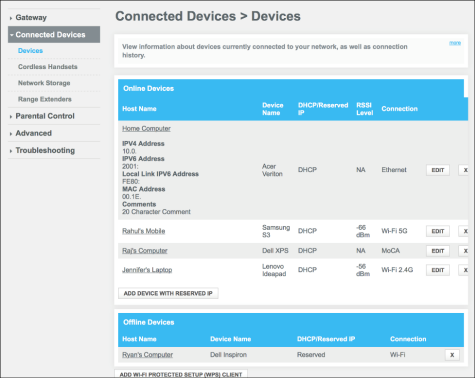
- Navigate to Connected Devices > Devices,
- Then repeat Steps 1 and 2 from above.
- Select the device name under Online Devices’ Host Name for which you wish to add a port forwarding rule.
- Select the IP address, then copy it.
- Paste the IP address into the previous browser window.
12. Save your changes.
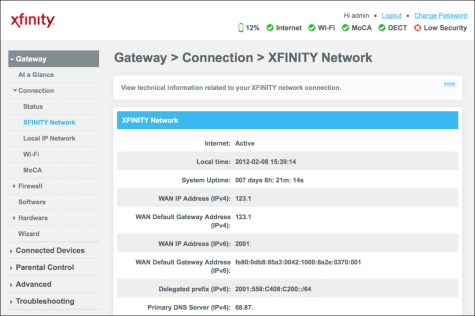
13. On the left side, note your WAN IP address under Gateway > Connection > XFINITY Network before logging out of the Admin Tool. This information will be needed to use the game or service.
How to Port Forward on Xfinity Routers
- If you have an Xfinity WiFi router, you can open a port by following these straightforward steps.
- First, log into your router’s web interface, which you can usually access by entering the router’s IP address in your web browser’s URL bar.
- If you’re unsure of the IP address, you can find it by running the ipconfig command in a Command Prompt or Terminal window.
- Once logged in, locate a section labeled “Port Forwarding” or “Applications and Gaming.”
- In this section, create a new entry for the port you want to open, ensuring you enter the correct protocol (TCP or UDP) and the IP address of the device you’re forwarding the port to.
- Save your changes and restart your router. After completing these steps, the specified port should be open. You can confirm this by using a port scanner.
How to access ports behind CGNAT with PureVPN
Accessing ports behind CGNAT is a common problem faced by most users. CGNAT (Carrier-Grade Network Address Translation) is a technique used by internet service providers to save IP addresses.
Since CGNAT blocks inbound connections, accessing devices or services behind it might be difficult. Nevertheless, PureVPN’s port forwarding add-on offers a safe and secure means for unblocking ports behind CGNAT, allowing you to access devices and services remotely.
PureVPN’s unique public IP address makes it easy to access ports behind CGNAT, assuring maximum performance and security.
The add-on protects your data and prevents illegal access using powerful encryption technologies. It also assigns every user a unique public IP address, which makes it more difficult for attackers to penetrate your connection, making it the best solution for you.
- Download and install PureVPN on your device.
- Connect to a port-forwarding-supporting server.
- Enable port forwarding in the app by going to the “Port Forwarding” tab.
- Specify the port number to be forwarded and the IP address of the device to which it must be forwarded.
- To save the changes, click Apply.
Host a server with a dedicated IP and port forwarding add on
If you plan to host a game server, whitelisted your IP, or have your friends connect to your devices at home, you’ll require a dedicated IP with a Port Forwarding add-on. A dedicated IP address lets you set up servers and permit external IP addresses to connect without worrying about IP mapping.
Frequently asked questions
You can define an unlimited number of port forwarding rules on your Xfinity xFi gateway. Nevertheless, keep in mind that setting a large number of rules may result in issues regarding network performance.
Yes, you may delete a port forwarding rule on your Xfinity xFi gateway by going to the Advanced Settings area and clicking the trash can button next to the rule you want to be deleted.
Generally, configuring port forwarding on your Xfinity xFi gateway doesn’t have any impact on your internet speed.
But, if you add a large number of rules or your devices aren’t configured correctly, you might have to face performance problems.
After making changes to your port forwarding settings, it’s usually recommended to monitor your network performance.
Conclusion
Port forwarding is a useful solution for remotely accessing your home network or configuring a server for gaming or other activities.
Setting up port forwarding in the Xfinity xFi web interface is not as difficult as it seems. By following the steps indicated in this guide, you can easily set port forwarding rules for your Xfinity gateway and start accessing the services you require.
PureVPN
December 17, 2025
7 months ago