Table of Contents
If you want to allow incoming traffic from the internet to reach a specific device or computer within your private network, you’ll need to set up port forwarding on your router. The process involves configuring a firewall or router to redirect incoming traffic from a specific port on the public IP address to a specific port on an internal device on your network. In this step by step guide, learn port forwarding Archer A7 Router in easy way.
Setting up port forwarding has numerous benefits, especially when it comes to file-sharing, remote access, gaming, network customization, and voice/video chatting. In this article, we’ll learn all the requirements, steps, and common protocols for setting up port forwarding Archer A7 router.
Things to gather beforehand
- A computer or a device connected to your Archer A7 router
- Any internet browser installed on the computer/device
- Your Archer A7 router’s IP address [found in router settings or user manual]
- The port number and protocol that needs to be forwarded
- The internal IP address of your device on the local network that needs to receive the forwarded traffic
Accessing the Archer A7 Router Settings
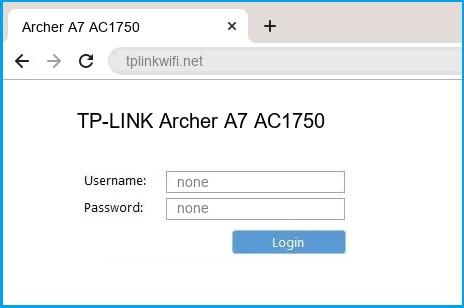
- Connect to Your Router
Use a device connected via Ethernet or Wi-Fi. - Open the Admin Page
- In your browser, type:
192.168.0.1ortplinkwifi.net - Press Enter.
- In your browser, type:
- Login
- Enter your admin username and password.
- Default:
admin/admin(unless changed).
Assigning a Static IP Address
You can set a static IP from the Archer A7’s DHCP Reservation menu:
- Go to Advanced > Network > DHCP Server.
- Find your device in the Client List.
- Click Add to reserve the IP.
- Save changes.
This ensures your forwarded ports always point to the right device.
Steps to set up port forwarding on Archer A7 routers
The following are the general steps you need to follow to set up port forwarding on the Archer A7 router:
- Open a web browser on the device/computer connected to your Archer A7 router and navigate to the router’s IP address.
- Access your router’s web interface by entering the admin username and password.
- Find the “Virtual Servers” or “Forwarding” option in the router’s settings or menu.
- Click the “Add” button to create a new port forwarding rule.
- Enter a name for the port forwarding rule.
- Select the protocol [TCP or UDP] for the port you want to forward.
- Enter the port number or range that you want to forward.
- Enter the local IP address of your device that will receive the forwarded traffic.
- Select the protocol [TCP or UDP] that your local device uses.
- Click the “Apply” or “Save” button to save the port forwarding rule.
You can repeat steps 4-10 to forward as many ports as possible. These steps may vary depending on your router’s firmware version and other factors. Refer to your router’s user manual or contact the manufacturer for detailed instructions.
Ports Archer A7 uses to provide network services
The following are some of the TCP/UDP ports that Archer A7 routers typically use to provide network services:
- TCP port 80: HTTP [web browsing]
- TCP port 443: HTTPS [secure web browsing]
- TCP port 21: FTP [file sharing]
- TCP port 22: SSH [secure shell]
- TCP port 23: Telnet [remote login]
- TCP port 25: SMTP [email sending]
- UDP port 53: DNS [domain name resolution]
- UDP ports 67 and 68: DHCP [automatic IP address assignment]
- UDP port 123: NTP [time synchronization]
Opening and forwarding ports can expose you to several security risks. For this reason, you should follow best practices and keep your router’s firmware up to date. Using PureVPN can prevent you from potential vulnerabilities that come with setting up port forwarding on your router.
Troubleshooting Archer A7 Port Forwarding
| Problem | Likely Cause | Solution |
|---|---|---|
| Port shows closed | CG-NAT enabled | Request public IP from ISP |
| Rule not working after restart | Device IP changed | Use static IP |
| Works on LAN but not remotely | ISP blocking certain ports | Try alternative port |
| Multiple devices need same port | NAT limitation | Use different external ports for each |
Make Easy & Secure Connection with port forwarding with VPN
PureVPN, coupled with its port forwarding addon, has been explicitly designed to add layers of protection to your network and make accessing and opening ports more straightforward.
Accessing ports behind CGNAT
Your ISP may be performing CGNAT to conserve IP addresses, making it more difficult for you to access and open ports. CGNAT involves sharing a single public IP address among multiple users, which can cause issues with port forwarding and accessing devices behind the network.
You can request your ISP for a public IP address or a static IP address, but remember that your ISP may deny your request. The easiest and quickest solution is using PureVPN with its port forwarding addon. It not only helps you bypass CGNAT but also keeps you protected from online threats.
Use PureVPN’s port forwarding add-on for greater control & flexibility
PureVPN’s port forwarding addon allows you to easily set up and manage port forwarding rules with its user-friendly interface. This addon offers more flexibility and versatility than manually setting up port forwarding rules.
Working around CGNAT restrictions can be challenging, but not when you’re using PureVPN’s port forwarding addon. Make complex network configurations a breeze while increasing customization options. You can access and manage your port forwarding settings from anywhere in the world!
Concluding remarks
This article contains all the information regarding the requirements, steps, and common protocols used to set up port forwarding on the Archer A7 router. As discussed, you can make opening ports and managing several port forwarding settings easier with PureVPN’s port forwarding add-on. Don’t take our word for it; try it out yourself!
Frequently Asked Questions
You can access your Archer A7 router’s port forwarding settings through its web interface. Open any browser on your computer/device connected to your router and log into the web interface using the admin username and password. Next, navigate to the “Forwarding” section and select the “Virtual Servers” option.
Before setting up port forwarding on your Archer A7 router, you need the port number[s] and protocol[s] to be forwarded. In addition, you will require the internal IP address of the device that will receive the forwarded traffic.
TCP [Transmission Control Protocol] is a connection-oriented protocol that ensures reliable data transfer. UDP [User Datagram Protocol] is a connectionless protocol that is relatively faster than TCP but less reliable.
You can set up port forwarding on your Archer A7 router for multiple devices by creating multiple virtual servers, each with its own internal IP address and port number.
If your port forwarding is not working, check that the correct port numbers and protocols have been forwarded to the correct internal IP address. You should also confirm that the service is running correctly on your device. Furthermore, you may also need to check for any security or firewall settings blocking the traffic.
PureVPN
August 11, 2025
11 months ago